Contents
- 1 Getting Started
- 2 Live TV
- 3 Channel Guide & EPG
- 4 Channel Management
- 5 Movies & Series
- 6 Timeshift & Catch-up
- 7 Recording & Reminders
- 8 Multi-View & Picture-in-Picture
- 9 Search
- 10 Storage
- 11 Profiles & Multi-User
- 12 Cluster & Multi-Device
- 13 Parental Controls
- 14 Appearance & Accessibility
- 15 Settings Reference
- 16 Network & Troubleshooting
- 17 BingeBop Pro
- 18 System & Maintenance
- 19 API & Integration
- 20 Support & Feedback
Getting Started
This chapter covers the first start of BingeBop. You add your TV sources, select what to import, tune your first channel, and learn about the controls available on phones and tablets.
1.1 Installing BingeBop
BingeBop is designed for Android TV and also runs on Android phones and tablets. Supported TV devices include NVIDIA Shield, Amazon Fire TV, Google TV, Xiaomi Mi Box, and most Android smart TVs.
Method 1: Download from the website
- On your TV or phone, go to bingebop.com/download .
- Select the download for your device. The APK downloads to your device.
- Open the APK. If the system asks, enable "Install unknown apps" for your browser or file manager in the device settings.
- Wait until the installation is complete. BingeBop then appears in your app list.
Method 2: Use the Downloader app
- Open the Downloader app on your Fire TV or Android TV (install it from the app store if you do not have it).
- Enter the download code: XXXXX (or type the full URL bingebop.com/dl ).
- The app downloads and installs BingeBop.
Method 3: USB drive
- Download the APK from bingebop.com/download on a computer.
- Copy the APK to a USB drive.
- Plug the USB drive into your TV. Open the APK with a file manager.
- If the system asks, enable "Install unknown apps" for the file manager.
After installation, open BingeBop. The setup wizard starts the first time.
1.2 The Setup Wizard
The setup wizard runs the first time you open BingeBop. It helps you add your first TV source. A source is the service that supplies your channel list and your streams.
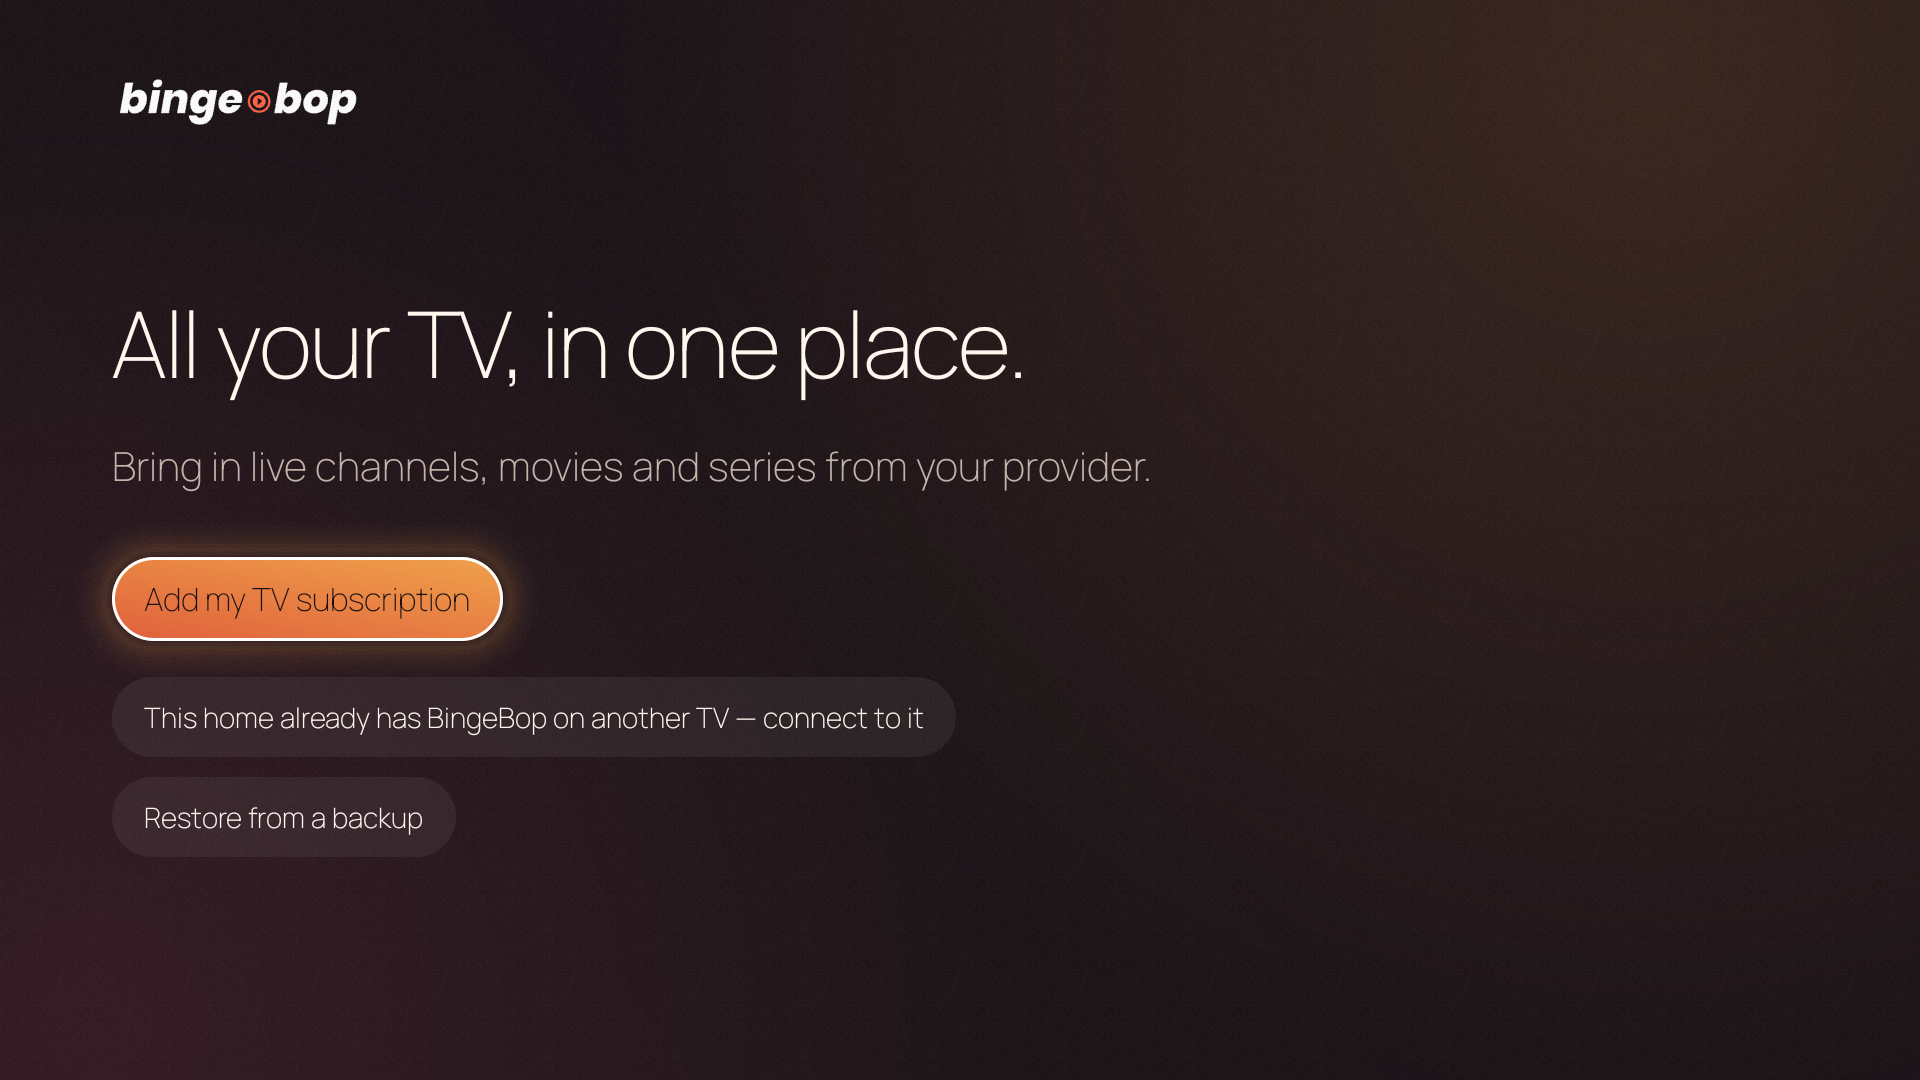
Figure 1.1 — The setup wizard welcome screen.
BingeBop supports these source types:
- Xtream Codes
- The most common IPTV provider format. Enter the server URL, your username, and your password. If the expiry date shown has passed, or the connection limit is lower than your household needs, contact your provider.
- M3U / Playlist URL
- A link to an M3U or M3U8 playlist file. If BingeBop offers to upgrade an M3U source, accept the upgrade to enable VOD browsing, catch-up, and series.
- HDHomeRun
- For over-the-air TV with an HDHomeRun network tuner. BingeBop finds HDHomeRun devices on your local network automatically. No configuration is necessary.
- Stalker Portal
- For MAG-style IPTV portals. Enter the portal URL and your device MAC address.
1.3 Adding an Xtream Codes Source
- Select Xtream Codes in the source type list.
- Enter your server URL (for example
http://provider.example.com), your username, and your password. Text entry is faster with the web remote than with the on-screen keyboard. - Select Next.
- If sign-in succeeds, continue to the import selection. If the expiry date has passed, contact your provider.
- Select what to import. See Section 1.4.
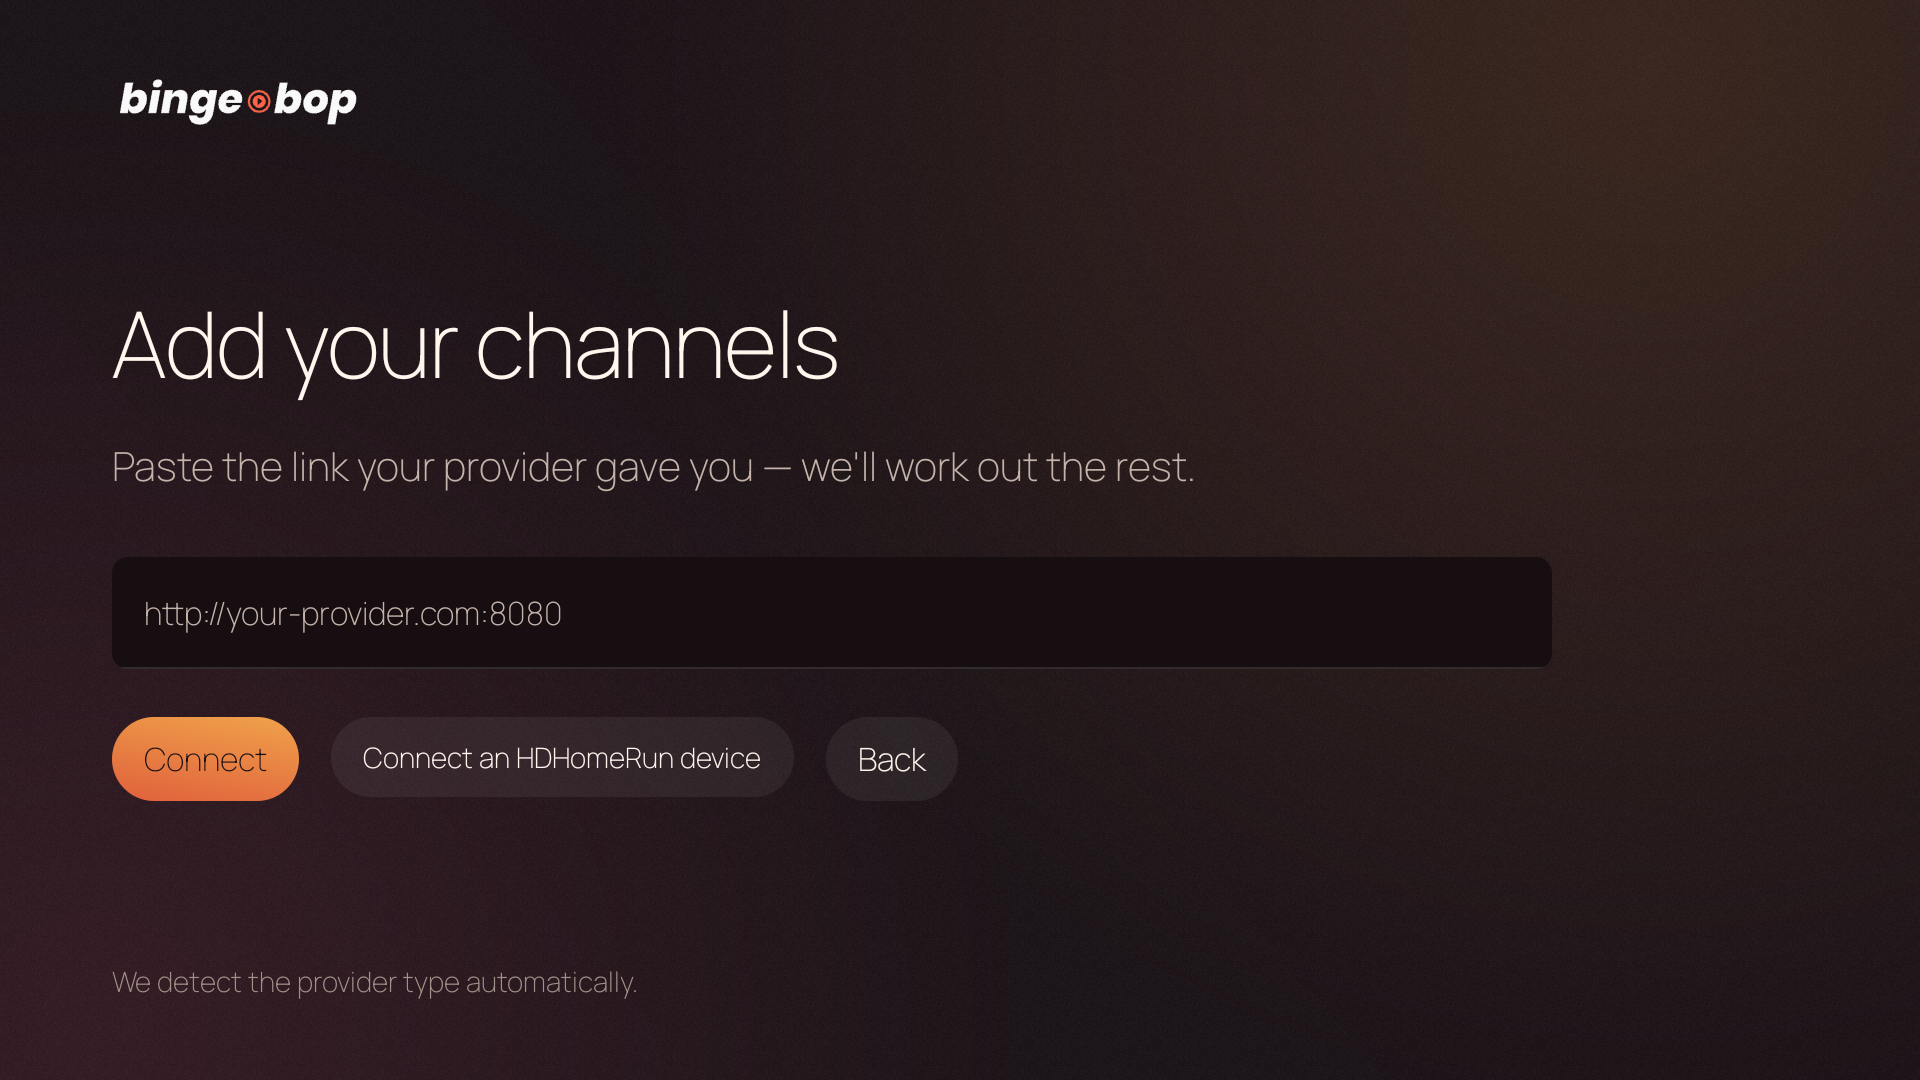
Figure 1.2 — Enter your provider URL. BingeBop detects the source type automatically.
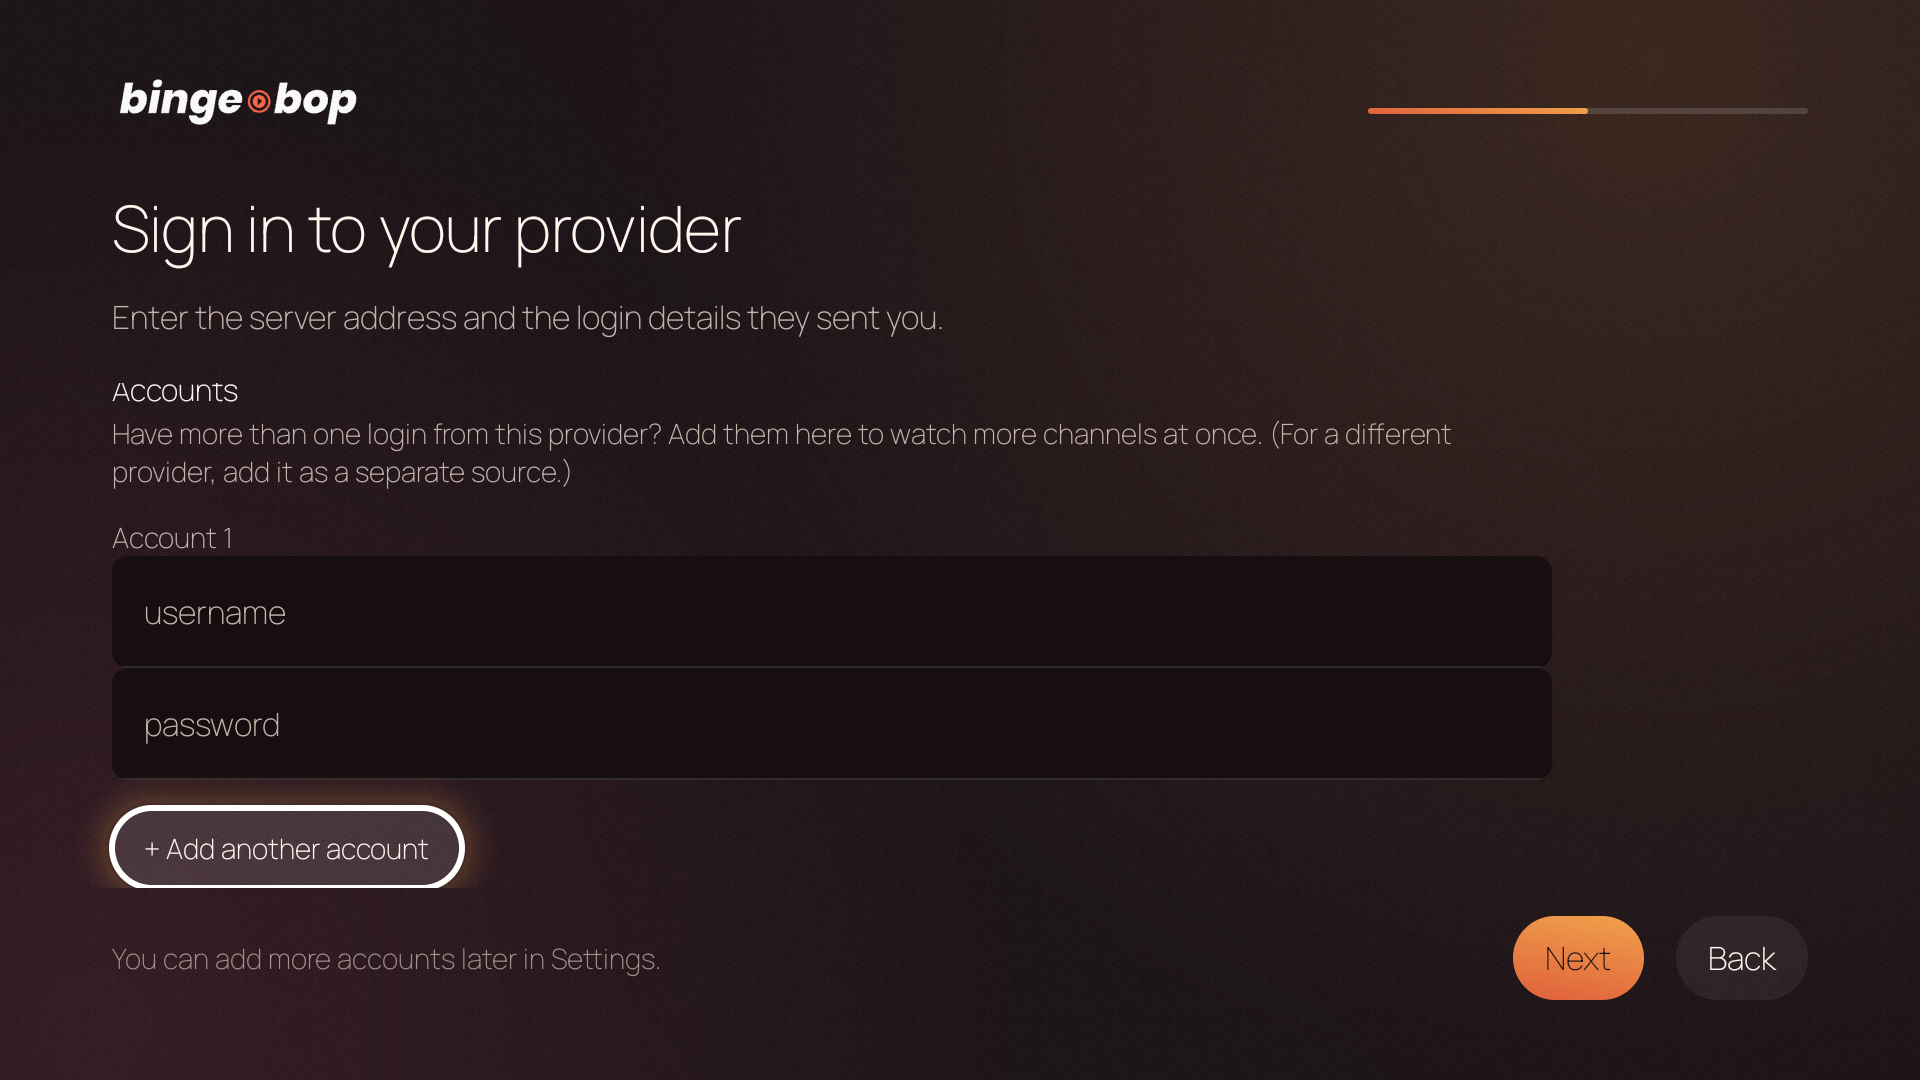
Figure 1.3 — Enter your username and password. You can add more than one account for the same provider.
1.4 Choosing What to Import
After you add a source, BingeBop asks which content to import. This selection controls your setup time. Less content gives a faster first load.
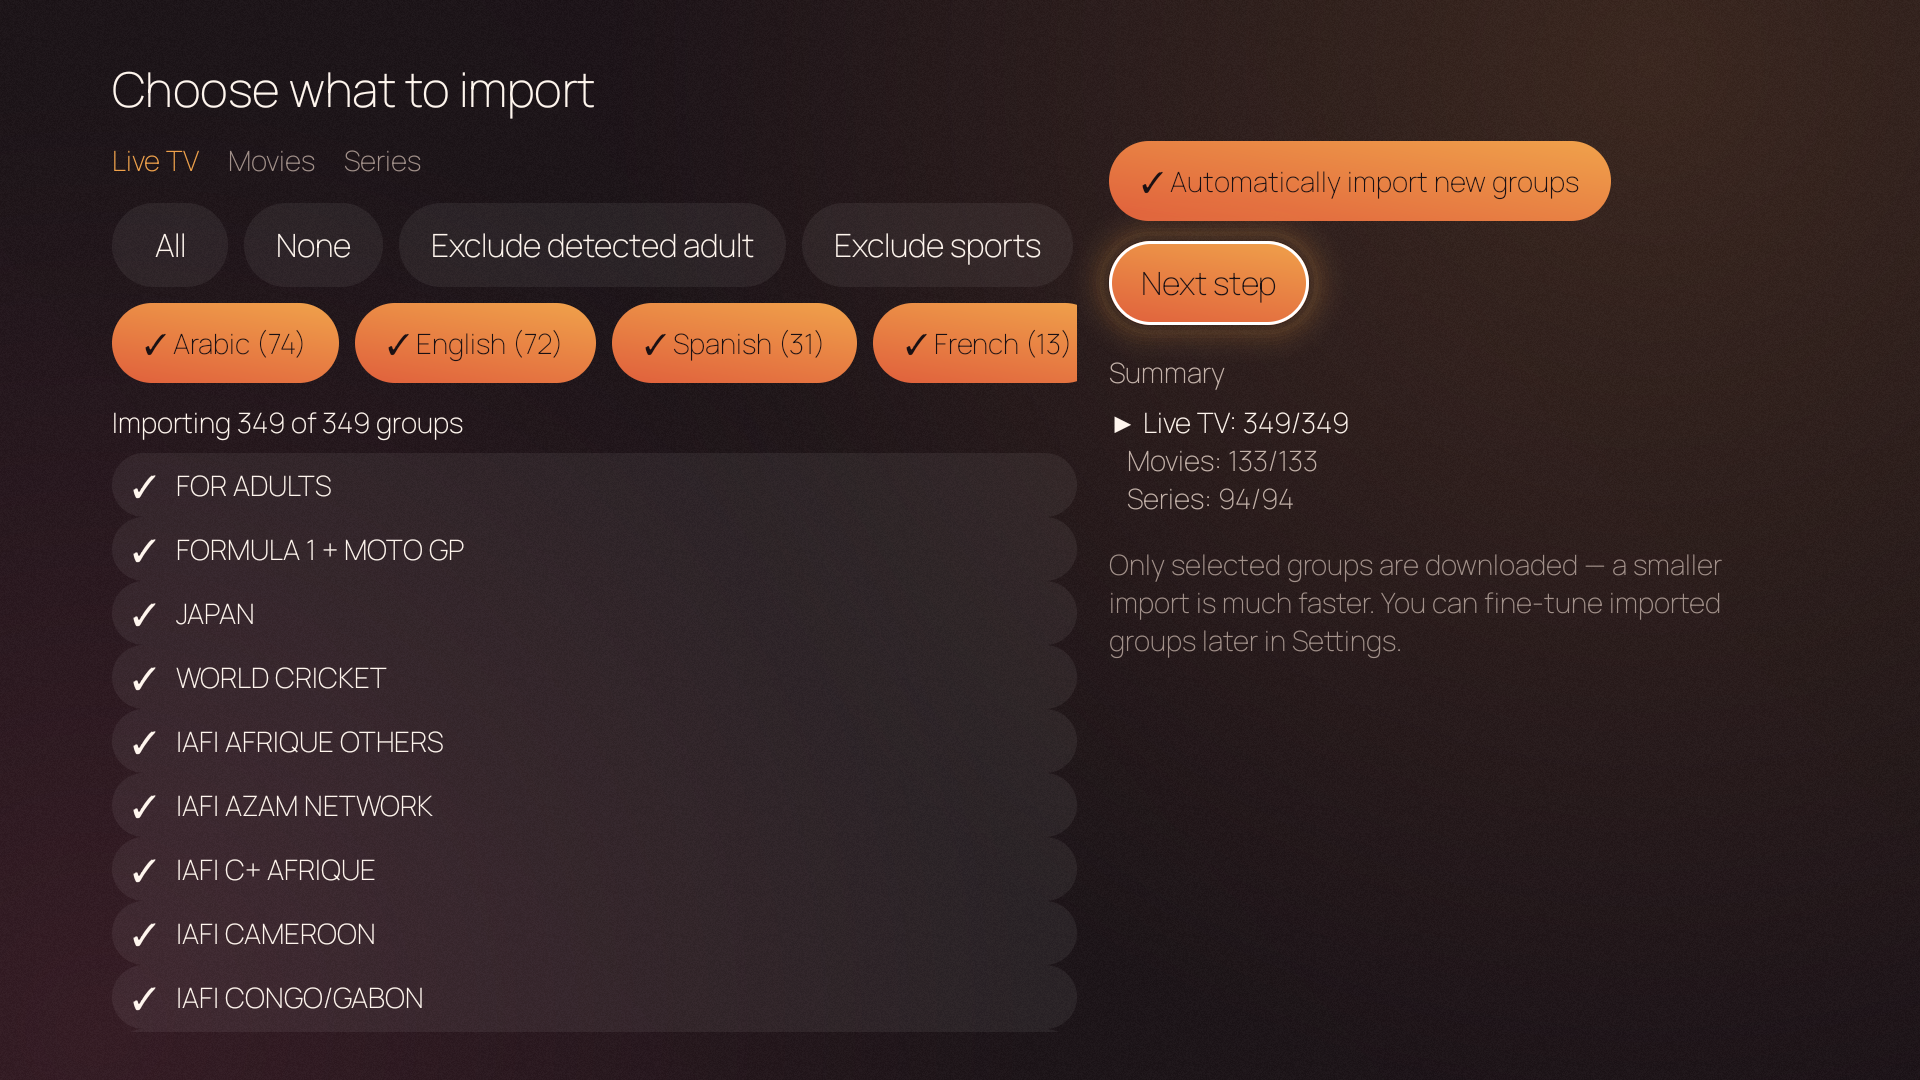
Figure 1.4 — The Quick Setup step: choose how much content to import.
There are three options:
- Live TV only (fastest)
- Imports live channels only. Movies, series, and VOD content are not imported. Select this option if you watch live TV only, or if you want to start quickly and add more content later.
- Everything (slower)
- Imports all content from the provider: live channels, movies, and series. A large provider can have more than 20,000 entries. This import takes several minutes.
- Custom selection
- Opens a category picker. Select the exact groups to import — for example "UK Channels" and "Sports", but not "Adult" or "VOD German". You can add more categories later in Settings.
1.5 Your First Channel
When the import is complete, BingeBop opens the Home screen. Select Live TV, then choose a channel to start watching.
These are the default controls in the player. You can customise button assignments in Settings → Accessibility → Remote Control & Shortcuts (see Chapter 14, Section 14.8).
| Button | Action |
|---|---|
| CH ↑ / CH ↓ or ↑ / ↓ | Tune to the next or the previous channel |
| OK | Show the player overlay with the controls and the show information |
| ◀ (Left) | Open the sidebar menu |
| OK then ↓ (Down) | Open the recent channels tray (press OK first to show the overlay, then Down) |
| BACK | Hide the overlay, or go back one step |
| 0–9 | Enter a channel number |
1.6 Using BingeBop on a Phone or Tablet
On a phone or tablet, tap the arrow handle on the right edge of the screen to open the touch remote. It is available throughout BingeBop, including during playback.
Remote controls
Use the D-pad, OK, and BACK as you would on a TV remote. Hold a D-pad direction, OK, or BACK to use its long-press action. Select # to open the number pad for direct channel entry.
Touch remote settings
Select the gear button on the touch remote to adjust its opacity, width, and auto-hide delay. Select Never for Auto-hide if you want the remote to remain open. These settings apply only to this device and are shared by all profiles on it.
Live TV
The BingeBop live TV player is built for speed. It gives you fast channel switching and controls made for a TV remote.
2.1 Channel Switching
To change channel, press CH ↑ / CH ↓ or the D-pad ↑ / ↓. You can also enter a channel number with the number keys.
Direct channel entry
Press a number key (0–9) to start a channel number. A pill on the screen shows the digits as you enter them. BingeBop waits about 1.5 seconds after the last digit, then tunes to that channel. To assign or change channel numbers, see Chapter 4, Section 4.5 — Channel Numbers.
Recent channels
To open the recent channels tray, first press OK to show the player overlay, then press ↓ (Down). The tray is a row of the last channels you watched. Select a tile to tune to that channel.
2.2 Player Overlay & Controls
During playback, press OK to show the player overlay. From the overlay, select a playback control or open the Tools menu.
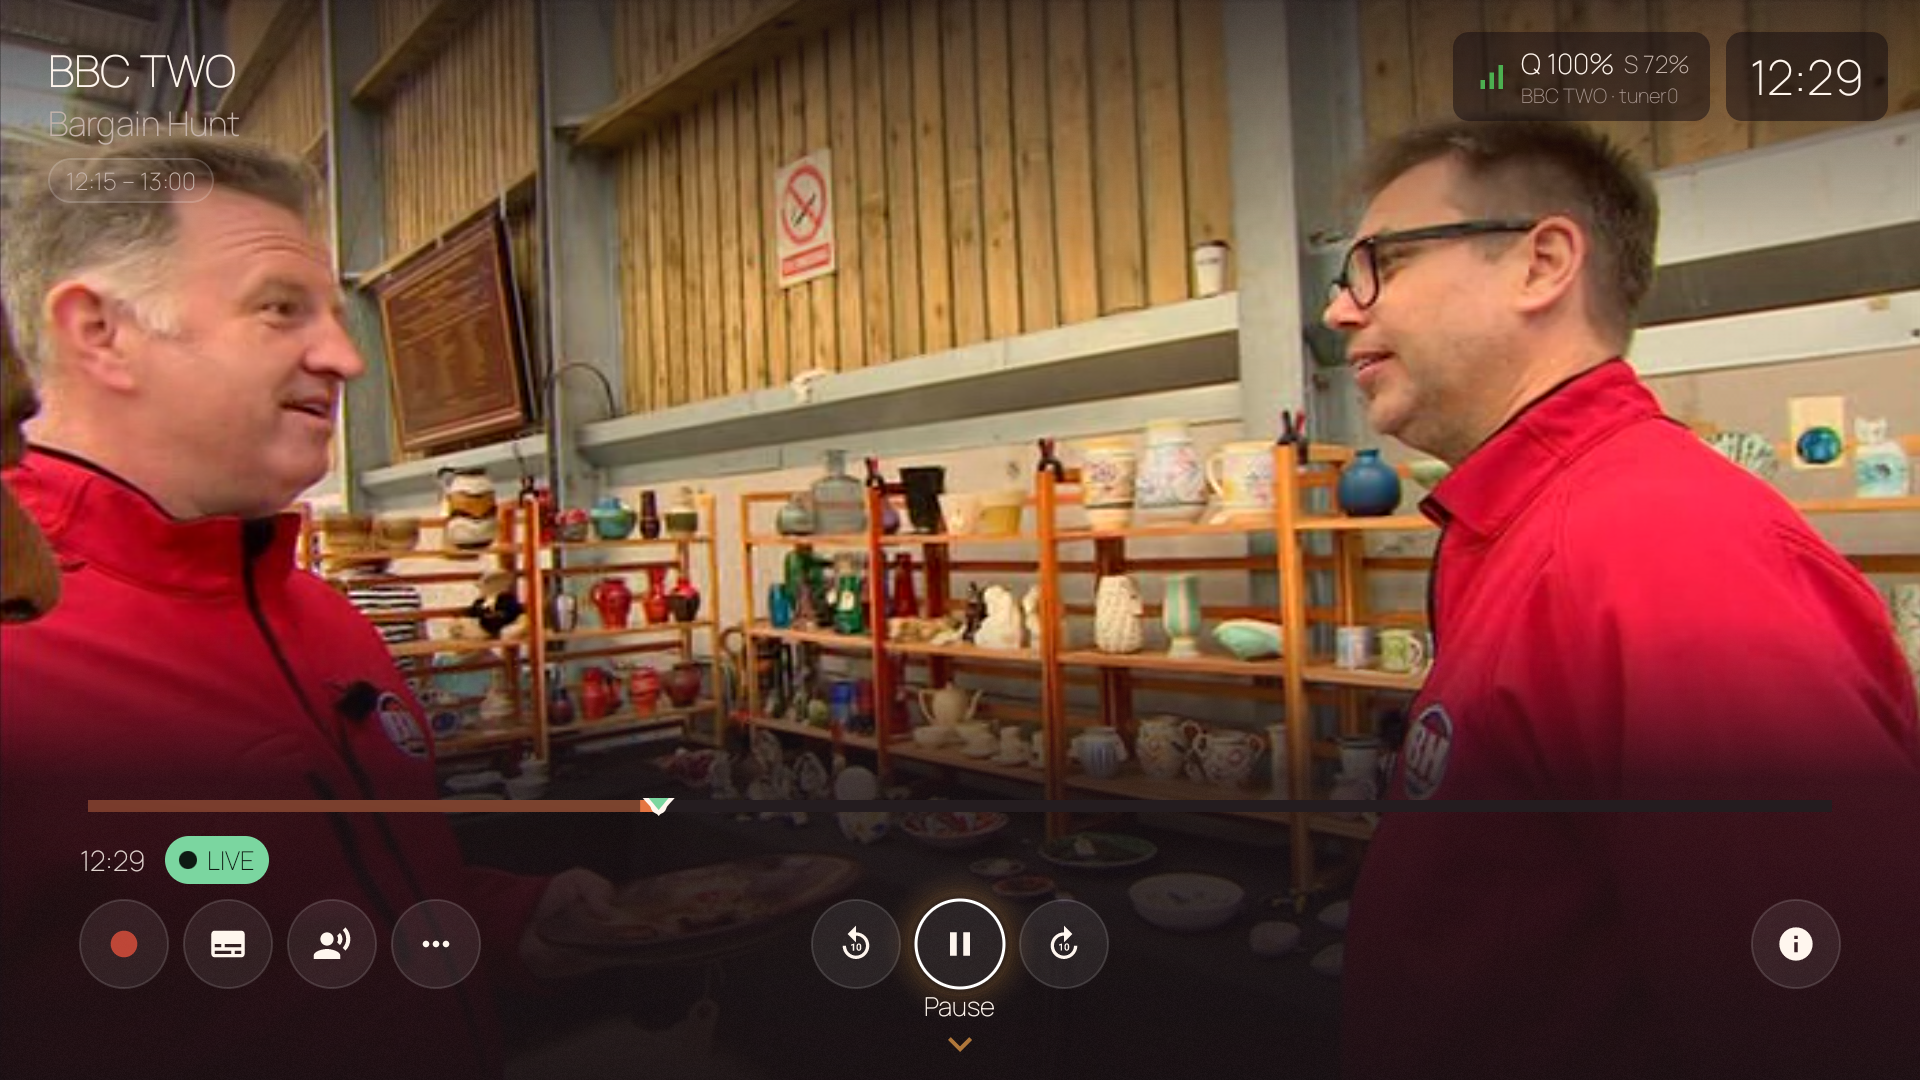
Figure 2.1 — The player overlay shows the current programme, a live/timeshift indicator, and transport controls.
| Control | What it does |
|---|---|
| Play / Pause | Pauses live TV and starts the timeshift buffer, or continues playback. |
| Seek bar | Press ↑ (Up) from the overlay to move focus to the seek bar. Use ◀ / ▶ to scrub through the timeshift buffer. |
| ● LIVE / Go to live | Returns you to the live edge. It also shows how far behind live you are. |
| Favourite / Unfavourite | Adds the live channel to your Favourites group, or removes it. |
| Tools menu | Audio tracks, subtitles, sleep timer, A/V sync, and picture mode. |
| Info button (i) | Shows programme information. Choose Stream details there to inspect the video format, codec, display mode, source, and playback path. |
2.3 Audio & Subtitles
Open the player tools menu to see the audio tracks and the subtitle tracks of the current channel. Select a track to change to it immediately.
Default language auto-selection
BingeBop can select your preferred audio and subtitle language automatically when you tune to a channel or start a movie. For movies, your preferred language can also pick a version in that language — a dub when one is available — so the movie title may appear in that language. Playback always reflects the stream that is actually selected. Set your preferred languages in Settings → Playback → Audio & Subtitles.
- Audio and movie language
- Select Off to keep the default of the broadcast, Automatic to use the language of your device, or a specific language. BingeBop uses it to select the matching audio track; for movies it can also choose a language-specific (dubbed) stream when a title combines several language versions, so catalogue titles may appear in that language and playback uses the stream that was selected.
- Automatically enable subtitles
- Turn this on to select your saved subtitle language whenever you start something new. Selecting subtitles while watching turns it on and remembers that language; choosing Off turns it off without losing the choice.
- Default subtitle language
- Select Automatic to use the language of your device, or choose a specific language. This choice is kept even while automatic subtitles are off. If it is unavailable, BingeBop tries English, then another available subtitle track.
Subtitle OCR
If subtitles cannot be restyled on some live channels, try enabling Subtitle OCR in Settings → Playback → Audio & Subtitles.
2.4 Aspect Ratio & Picture
If the picture does not fill the screen correctly, open the tools menu and change the aspect ratio:
- Auto
- Uses the aspect ratio reported by the stream. When no aspect ratio is signalled, defaults to filling a 16:9 screen. This is correct in almost all cases.
- 4:3
- Forces a 4:3 picture. Use to fix SD broadcasts that arrive mistagged as 16:9.
- 16:9
- Forces a 16:9 picture. Use to fix anamorphic streams that arrive tagged as 4:3.
- Stretch
- Stretches the picture horizontally. Use to un-squash anamorphic content stored inside a 4:3 area within a 16:9 frame.
- Zoom
- Punches in and crops the edges. Use to defeat encoded black bars or station logos at the picture edge.
- Letterbox
- Same un-squash as Stretch, but fits to full screen width with black bars on top and bottom instead of cropping the sides. Use for anamorphic widescreen movies that Stretch crops.
- Fill Height
- Stretches the picture vertically, keeping full width. Crops baked-in black bars off the top and bottom without cutting the sides. Use for 16:9 content that a broadcaster letterboxed into a wider frame.
2.5 A/V Sync Adjustment
Sometimes the audio is a little ahead of the video, or behind it. This can happen with a soundbar or an AV receiver on HDMI, or with certain streams from your provider. To correct it, open the A/V Sync slider. Positive values delay the audio. Negative values delay the video.
BingeBop saves this adjustment for each channel. A device-wide offset is also available in Settings → Playback → Video → A/V Sync Device Offset. Use it for an HDMI delay that applies to all channels.
2.6 Auto Frame Rate
BingeBop can change the refresh rate of your TV to match the content. It uses 50 Hz for a European broadcast and 24 Hz for a film. This removes the motion judder that a wrong refresh rate causes.
Auto frame rate is on by default and needs no attention. To turn it off, or to set a minimum resolution, open Settings → Playback → Video.
2.7 Sleep Timer
Set a timer to stop playback after a period of time. This is useful if you go to sleep while you watch TV.
The durations are 15, 30, 45, 60, 90, and 120 minutes. Two more options are available: End of programme uses the end time of the current show, and End of episode works with VOD series.
2.8 Error Recovery
A channel can stop for several reasons. The provider can drop the connection, the network can fail, or the channel can go off-air. Wait briefly for automatic recovery. If playback does not resume, select Troubleshoot connection.
If BingeBop cannot connect again after several attempts, a "Troubleshoot connection" button appears. Select it to open the network path diagnostic. See Chapter 16: Network & Troubleshooting.
Channel Guide & EPG
The Channel Guide is a full-screen programme grid. This electronic programme guide (EPG) shows what is on now, what comes next, and what aired in the past on all your channels.
3.1 Opening the Guide
There are two ways to open the Channel Guide:
- In the player, press ◀ (Left) to open the sidebar menu. Then select TV.
- If you assigned a remote button to the guide, press that button. See Chapter 14.
The guide opens on top of the live video. Your current channel continues to play in the top-right corner while you browse.
3.2 Guide Layout
The guide has two zones:
Programme detail (top)
Highlight a show in the grid to see its details.
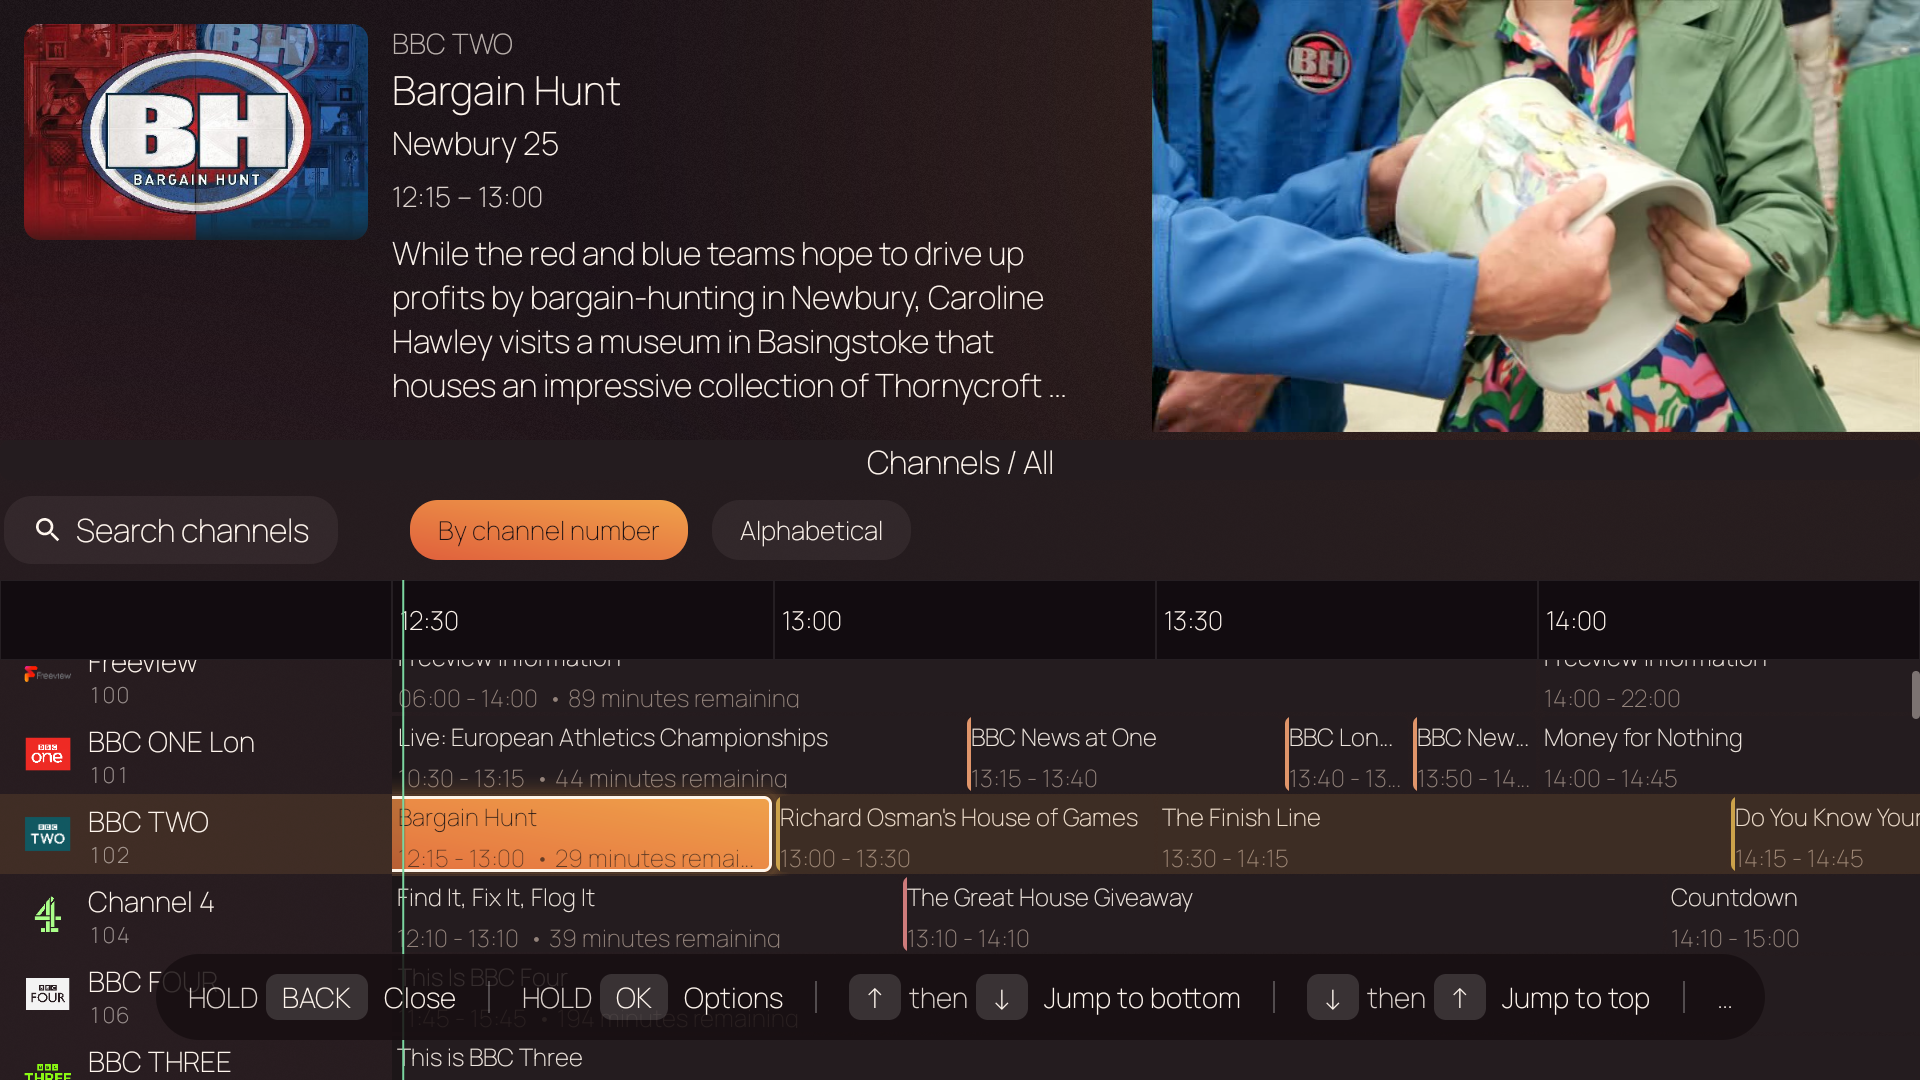
Figure 3.1 — The programme detail area shows full information for the highlighted programme.
Channel grid (bottom)
The grid is below the detail area. The vertical now line marks the current time.
Use the sort option to order channels by channel number or alphabetically. This same order also controls which channel you reach next or previous when you change channels.
3.3 Navigating the Guide
| Button | Action |
|---|---|
| ↑ / ↓ | Moves to the channel above or below. The time position does not change. A long show therefore cannot pull the highlight sideways. |
| ◀ / ▶ | Moves to the previous or the next show on the same channel. The grid scrolls sideways through 14 days. |
| OK | Tunes to the highlighted channel and closes the guide. |
| Hold OK | Opens the channel context menu. See Section 3.5. |
| BACK | If the grid is away from the current time, returns to "now" and highlights the show that is on. If the grid is already at "now", closes the guide and returns to playback. |
| Hold BACK | Closes the guide immediately from any scroll position. |
3.4 Groups & Filtering
The Groups panel is a list of channel categories. To open it, highlight the show at the left edge of the grid and press ◀ (Left).
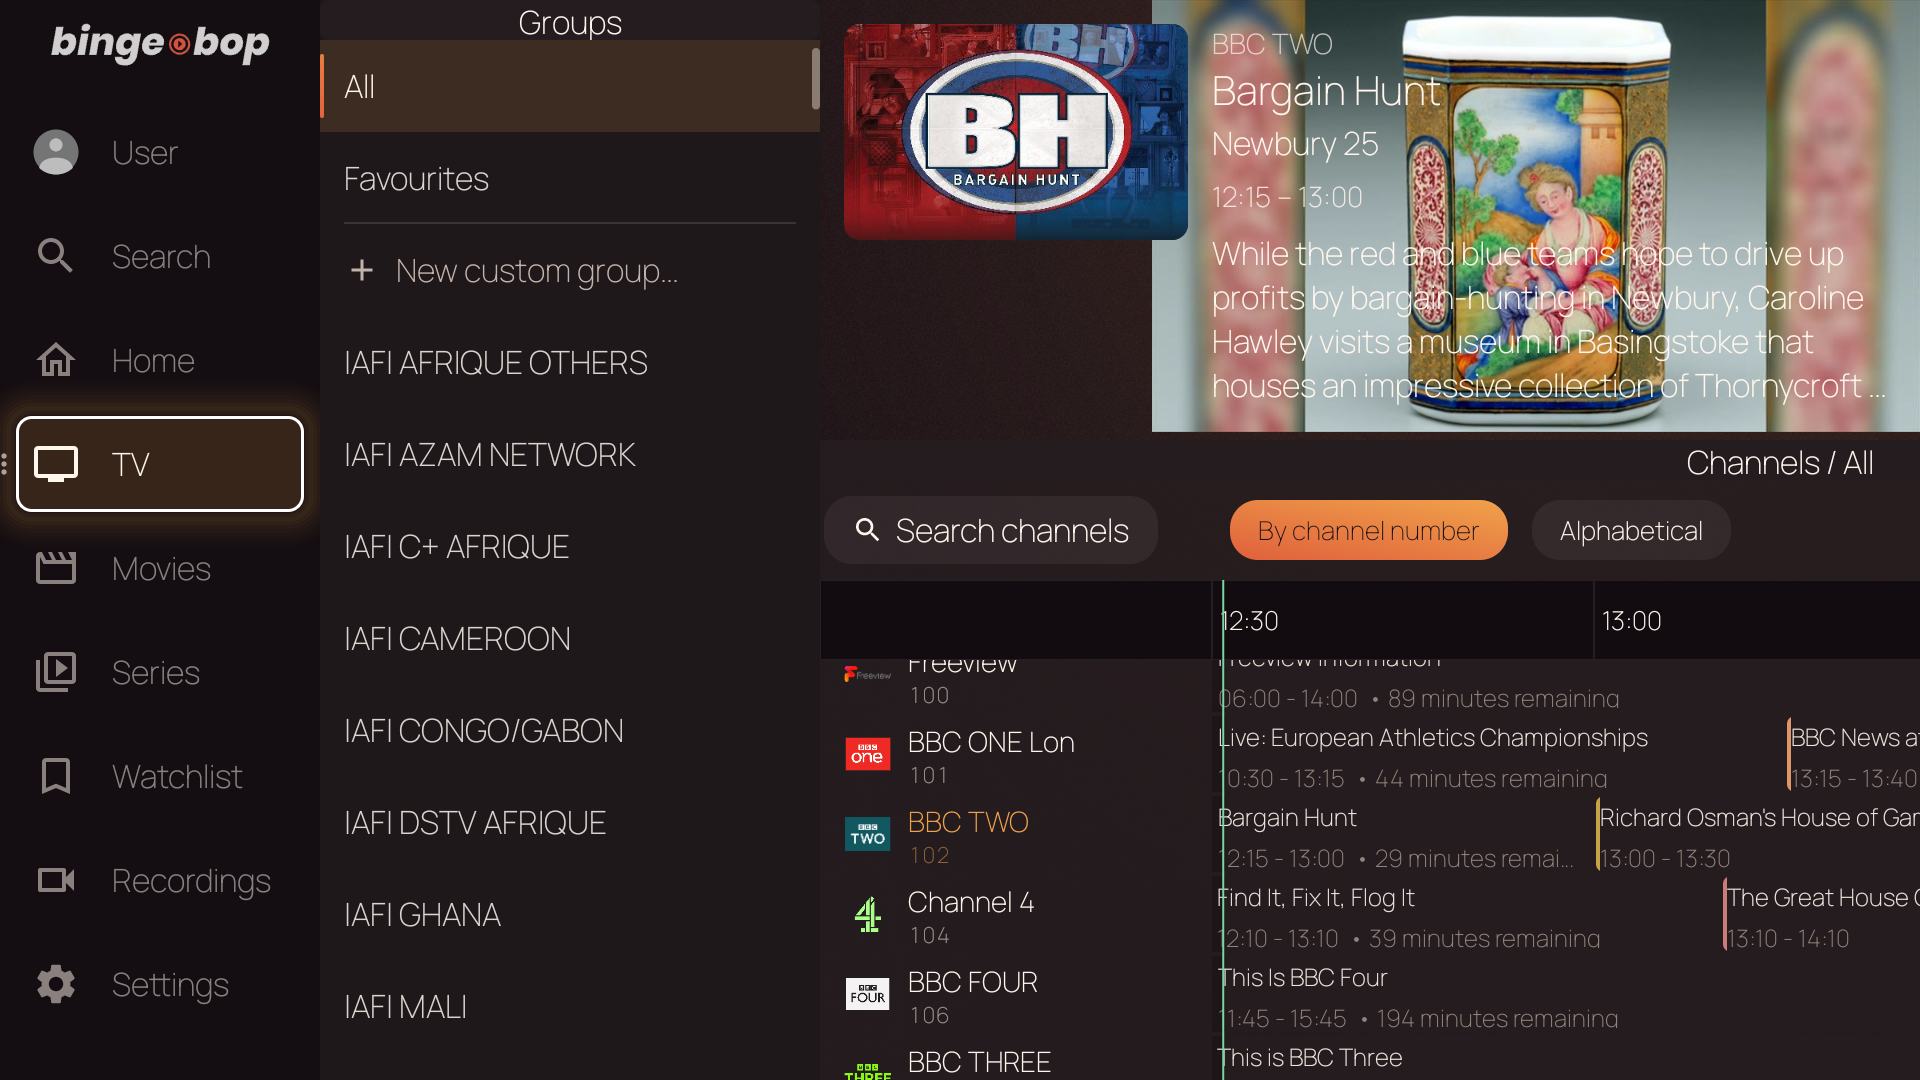
Figure 3.2 — The Groups panel lets you filter the guide to show only channels from a specific group.
Select All, Favourites, a provider group, or a custom group to filter the guide. To make your own group, select "+ New custom group" at the bottom of the panel.
The header then shows the active group, for example "Channels / Sports". To return to the channel grid, press ▶ (Right).
3.5 Channel Context Menu
To open the context menu, hold OK on a channel row. The menu shows the channel name at the top and these actions:
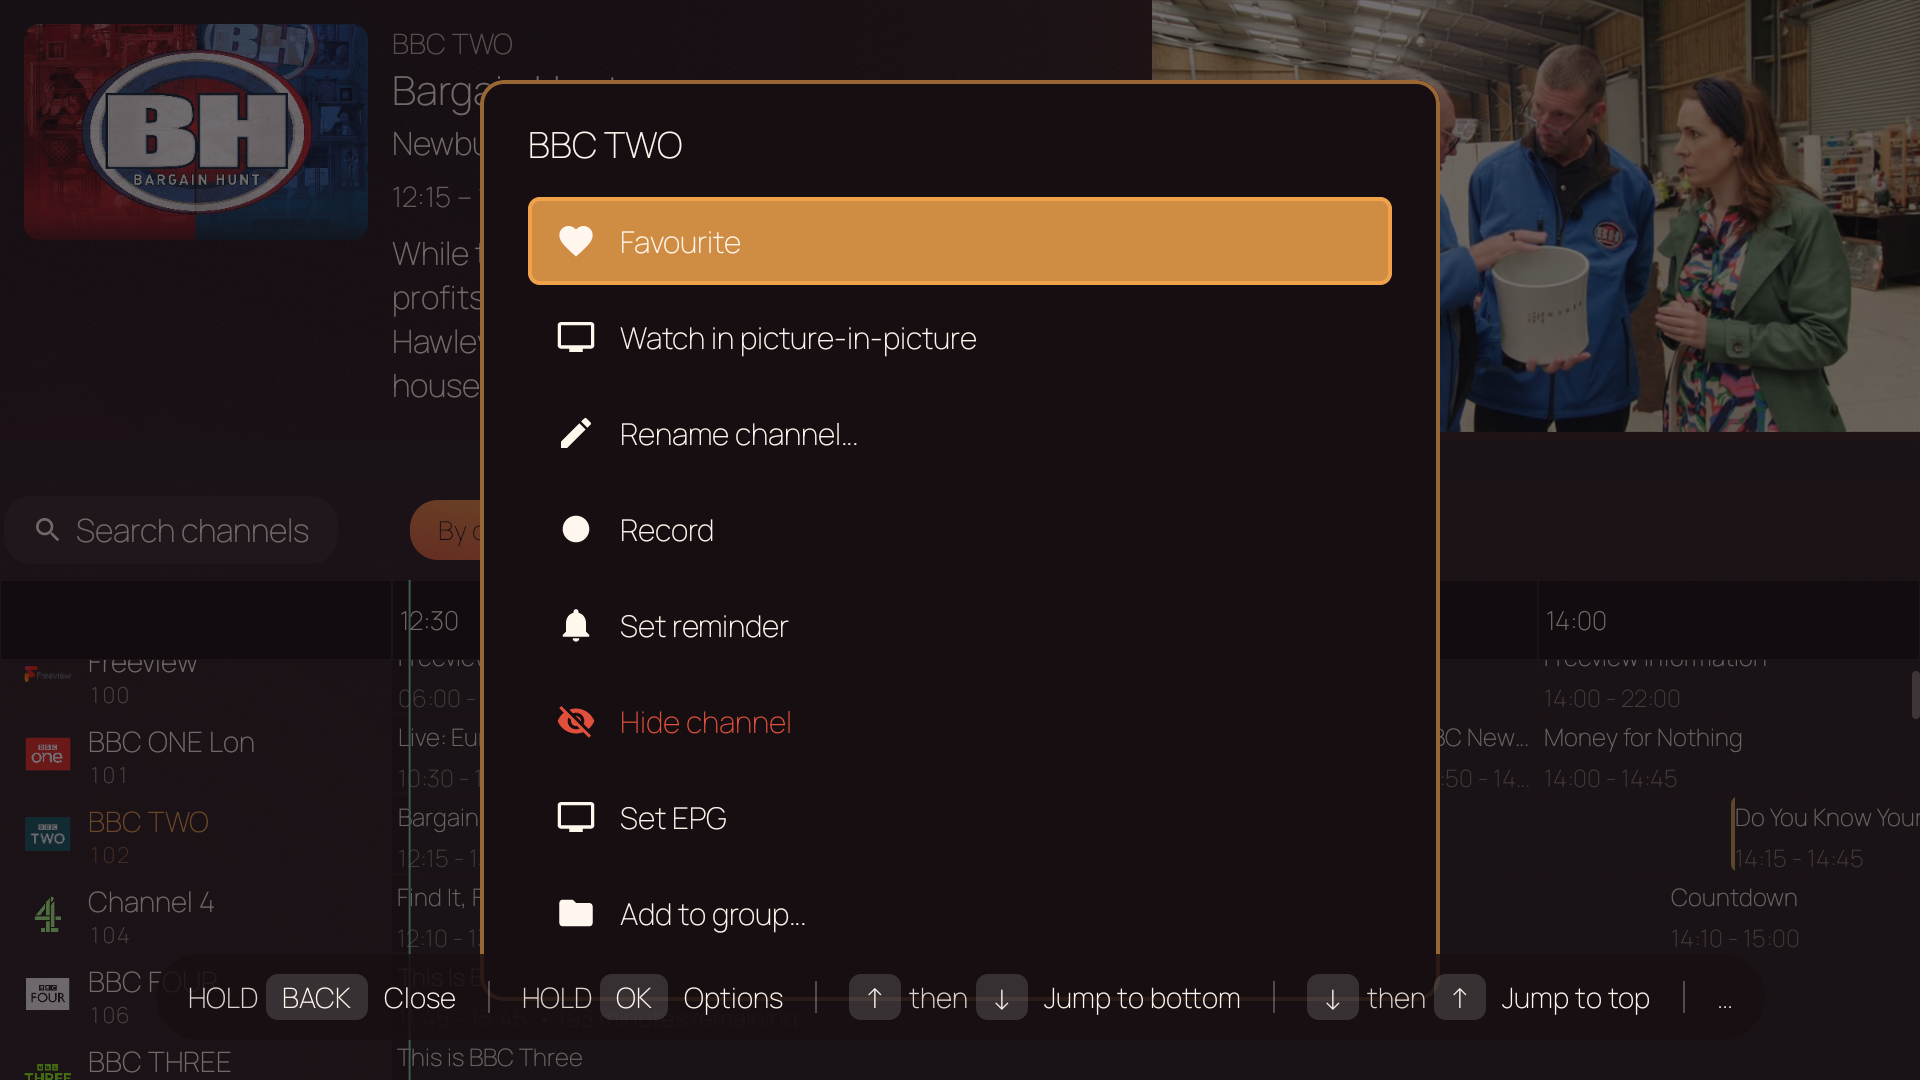
Figure 3.3 — The channel context menu gives quick access to channel management actions.
- Favourite
- Adds the channel to your Favourites group, or removes it.
- Watch in picture-in-picture
- Starts this channel in a small inset while your main channel continues to play. This action needs a device with a second video decoder.
- Rename channel...
- Gives the channel your own name. For example, you can shorten "UK | BBC ONE HD" to "BBC One".
- Record
- Records the highlighted show. See Chapter 7: Recording & Reminders.
- Set reminder
- Sets a reminder. BingeBop tunes to the channel when the highlighted show starts. See Chapter 7.
- Hide channel
- Removes this channel from the guide for your profile. To recover a hidden channel, open Settings → Content → Hidden Items.
- Set EPG
- Binds this channel to a specific EPG data source. See Section 3.8.
- Add to group...
- Adds the channel to a custom group.
3.6 Searching Channels
The search field at the top of the guide filters the channels by name. Move up from the channel grid to reach it. Enter a few characters, and the channel list filters as you type.
3.7 Genre Colours
Genre colours are on by default. Each cell in the grid then shows a thin colour stripe at its left edge. The colour tells you the type of the show: blue for movies, green for sports, amber for news, and so on. This lets you scan the guide quickly. Genre colours depend on the provider sending programme type information in the EPG data — if your provider does not include it, the colour stripes will not appear.
In the Appearance settings, change the colour of each genre, or turn genre colours off.
3.8 Manual EPG Binding
BingeBop normally matches channels to EPG data automatically. If a channel has missing or incorrect programme information, set its EPG match manually.
To set the EPG match for a channel yourself:
- Hold OK on the channel in the guide to open the context menu.
- Select Set EPG. A picker opens with all available EPG channels.
- Search by channel name, by EPG ID, or by the title of the show that is on now.
- Select the correct EPG channel. The guide updates immediately.
To remove your setting and return to automatic matching, open the same context menu and select Clear EPG binding.
3.9 EPG Time Offset
Sometimes a source gives the times in the wrong time zone. Shows then start one hour early or one hour late in the guide. If this happens, move the whole EPG of that source.
Use the -30 min and +30 min buttons to set the offset. A small live preview shows the result. Use it to confirm that the shows agree with the current time.
BingeBop applies the offset on all devices in your cluster.
3.10 Guide Settings
These settings control the appearance and the behaviour of the guide:
- Channel sort order
- Settings → Content → Guide & Display → Channel list order — sorts channels by number, which is the default, or alphabetically. It also sets the order used when changing to the next or previous channel. This is a setting for this TV.
- Group order
- Settings → Content → Guide & Display → Group order — choose the provider's category order, either interleaved (the default, which alternates providers by their category position), one after another (all groups from one provider before the next), or A–Z. Your choice is personal and follows your profile to paired devices.
- Show channel numbers
- Settings → Content → Guide & Display → Show channel numbers — shows or hides the channel numbers in the guide.
- Show channel icons
- Settings → Content → Guide & Display → Show channel icons — shows or hides the channel logos.
- Guide banner size
- Settings → Content → Guide & Display → Guide banner size — choose Large for the full programme detail and preview, Small for the title, time, channel, and compact preview, or Off to use the whole guide for the grid.
- Auto-close timeout
- The guide closes after 90 seconds without input. Change this time, or turn it off, in the playback settings.
Channel Management
Organize your channels. Mark the channels you watch most as favourites, hide the channels you do not want, give channels clearer names, and make your own groups.
4.1 Favouriting Channels & Groups
A favourite channel or group is quick to reach. Favourite groups stay at the top of the Groups panel, and favourite channels appear in the Favourites filter.
Favourite a channel
- In the Channel Guide, highlight the channel.
- Hold OK to open the context menu.
- Select Favourite.
The channel now appears in the Favourites group in the Groups panel.
Favourite a group
- In the Channel Guide, press ◀ (Left) to open the Groups panel.
- Highlight the group.
- Hold OK to open the group context menu.
- Select Favourite.
Favourite groups stay near the top of the Groups panel, below "All" and "Favourites". You reach them without scrolling.
4.2 Hiding Channels & Groups
Hide the channels and groups you never watch. The guide then stays clear. A hidden item disappears from every view of your profile: the guide, the search results, and the Home dashboard.
- In the Channel Guide, highlight the channel. For a group, open the Groups panel and highlight the group.
- Hold OK to open the context menu.
- Select Hide channel, or Hide for a group.
A hidden channel stays hidden after a playlist refresh and after an EPG update. Your provider can change the channel list, but the channel remains hidden. A channel hidden in Household Settings mode is hidden for every profile and cannot be unhidden by individual profiles. Profiles can hide additional channels for themselves, but they cannot override a household hide. Note that hiding a group hides all its channels — even if a channel also belongs to another group that is visible, it still disappears.
Recovering hidden items
To show a channel or a group again, open the Hidden Items panel in the settings. It lists everything you hid. Restore the items one by one.
4.3 Renaming Channels
Provider channel names often contain extra text such as "HD", "FHD", country codes, and quality markers. Give any channel a clean name of your own.
- In the Channel Guide, highlight the channel.
- Hold OK to open the context menu.
- Select Rename channel...
- Enter the new name and confirm it.
Your name belongs to your profile, and it syncs to all your devices in the cluster. A rename made in Household Settings mode applies to every profile as the default name — individual profiles can still override it with their own rename (see the note at the top of this chapter). BingeBop keeps the original provider name. To use it again, open the context menu and select Reset to default name.
Automatic name cleanup
BingeBop can clean many names at the same time. It removes quality tags, country prefixes, and decorative symbols from channel and group names. Name cleanup is a household-level setting — it applies to every profile and syncs across all devices in the cluster. These settings are available:
- Country prefix format
- Controls how a country prefix appears. Remove it, show a short code (UK), show it in brackets ([UK]), show a flag, or keep the original text.
- Strip decorative symbols
- Removes symbols such as stars, arrows, and brackets. Some providers add these to channel names.
- Suggested cleanups
- BingeBop examines your channel names and proposes cleanup rules. Read each rule and apply the ones you want.
- Custom rules
- Write your own find-and-replace rules for the patterns of your provider.
4.4 Groups & Custom Groups
A group is a category of channels. Your provider supplies most groups, for example "Sports", "News", and "UK Entertainment". You can also make your own groups and move channels between them. Use Settings → Content → Guide & Display → Group order to arrange provider groups in their category order (interleaved or one provider at a time), or alphabetically. New groups can appear in their intended place while an import is still running.
Creating a custom group
- In the Channel Guide, press ◀ (Left) to open the Groups panel.
- Scroll to the bottom and select + New custom group.
- Enter a name for the group and confirm it.
Adding channels to a group
- In the Channel Guide, highlight a channel.
- Hold OK to open the context menu.
- Select Add to group...
- Select the group in the list.
Managing group membership
To add or remove many channels at the same time, hold OK on a group in the Groups panel and select Manage channels.... A full-screen editor with two panes opens. In this editor you can search, select several channels, and move them into or out of the group.
Renaming groups
Hold OK on a group in the Groups panel, then select Rename.... The new name applies to your profile only. Other members of the household continue to see the original name until they rename the group too.
4.5 Channel Numbers
Every channel in BingeBop has a number. To tune to a channel, enter its number with the number keys on your remote. BingeBop assigns the numbers during the import. The numbers do not change after a playlist refresh, so a channel keeps its number.
How numbers are assigned
A channel number you pin overrides other numbers. If you do not pin a number, BingeBop uses the provider number or assigns one automatically.
Setting a channel number manually
Open the Channel Numbers panel in Settings → Content. It lists all channels with their current numbers. Select a channel, then enter a new number to pin it.
Per-group number ranges
Propose a start number for a group. For example, all "Romanian" channels can start at 1500. Leave it blank to use the normal 10000+ automatic range. This is a proposal, not a rule: pinned numbers still win, and BingeBop resolves conflicts automatically. You can also turn on Ignore provider numbering when a provider's channel numbers are unreliable; those channels then use the automatic range instead. Channel numbers are global, so this also affects a channel that appears in another group.
Movies & Series
Browse, play, and follow the movies and TV series of your IPTV provider. BingeBop merges the same title from different sources automatically. You therefore see one clean library, not three copies of the same film.
5.1 Browsing Movies
Choose All, Watchlist, a provider category, or a custom group, then select a movie poster.
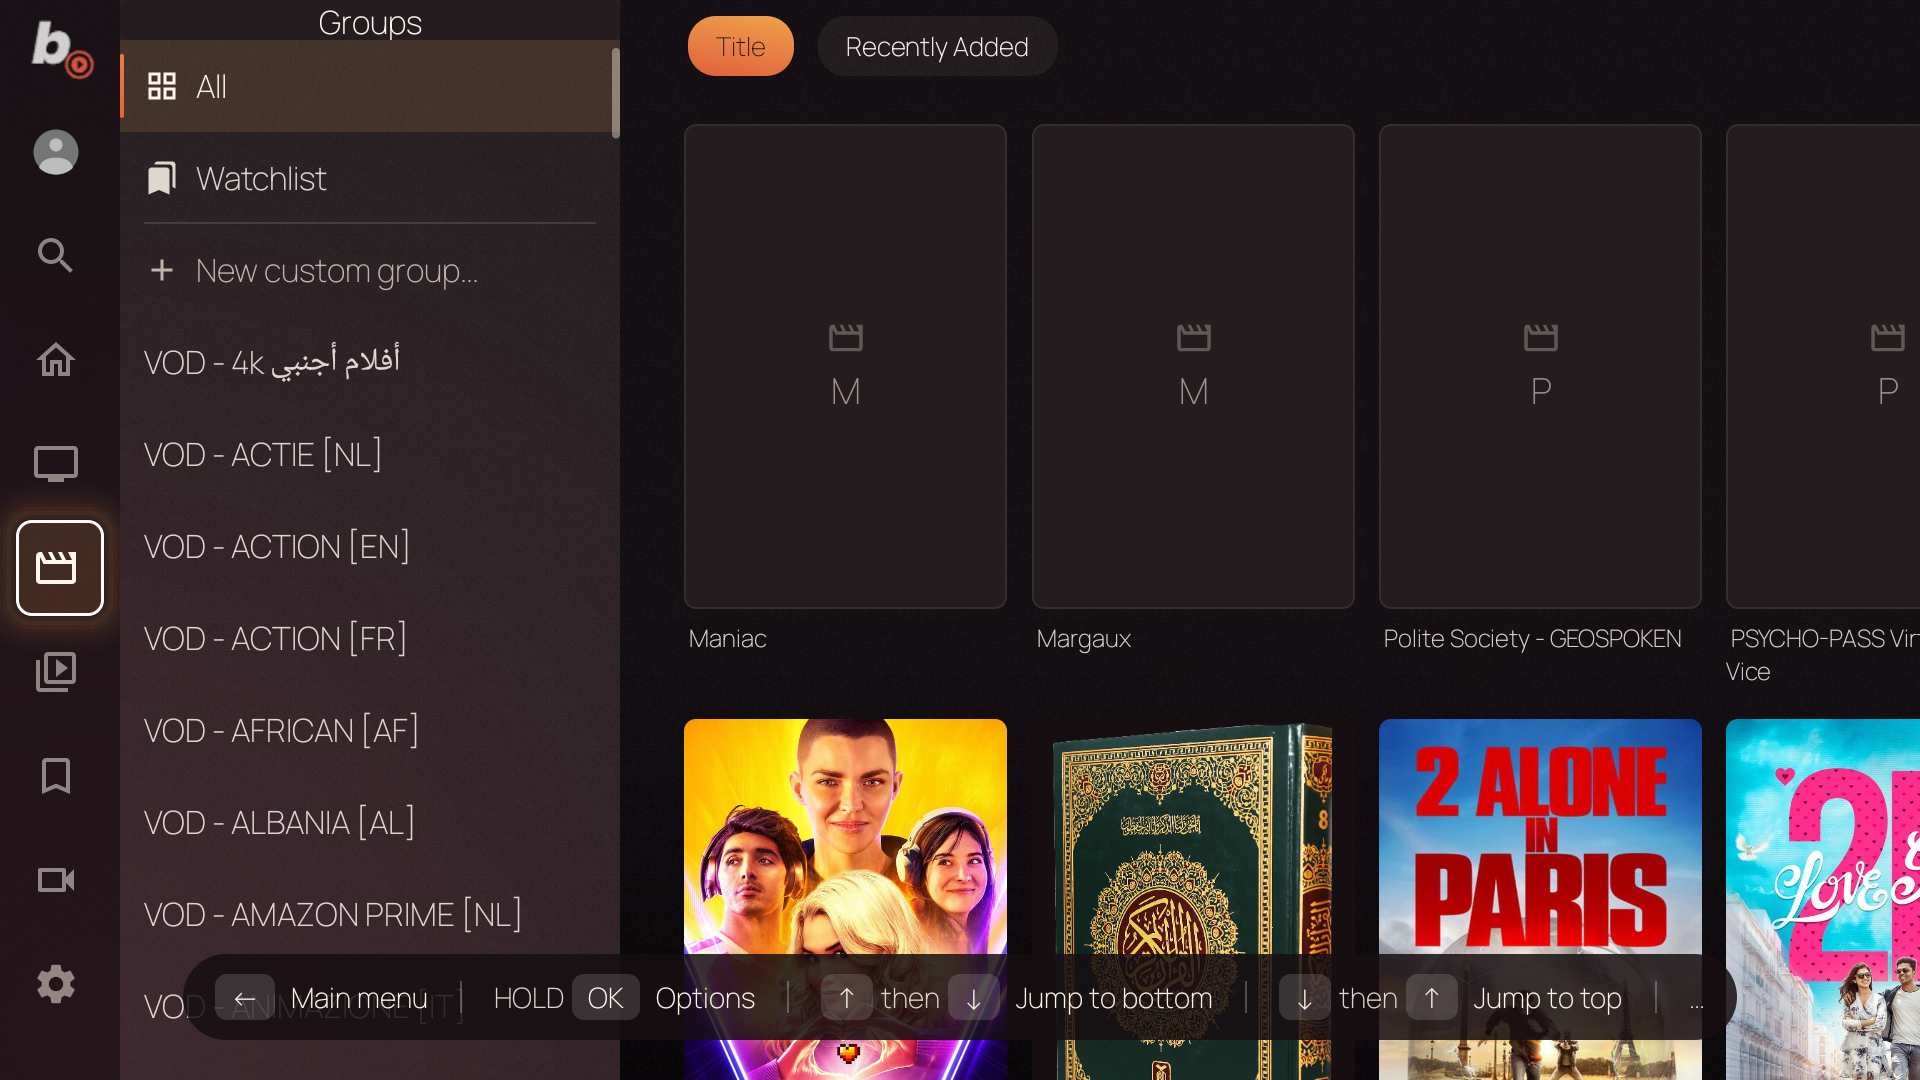
Figure 5.1 — The Movies screen: category groups on the left, poster grid on the right.
The chips at the top of the grid set the sort order. Sort by Title for alphabetical order, or by Recently Added.
5.2 Movie Detail Screen
Select a movie poster to open its detail screen.
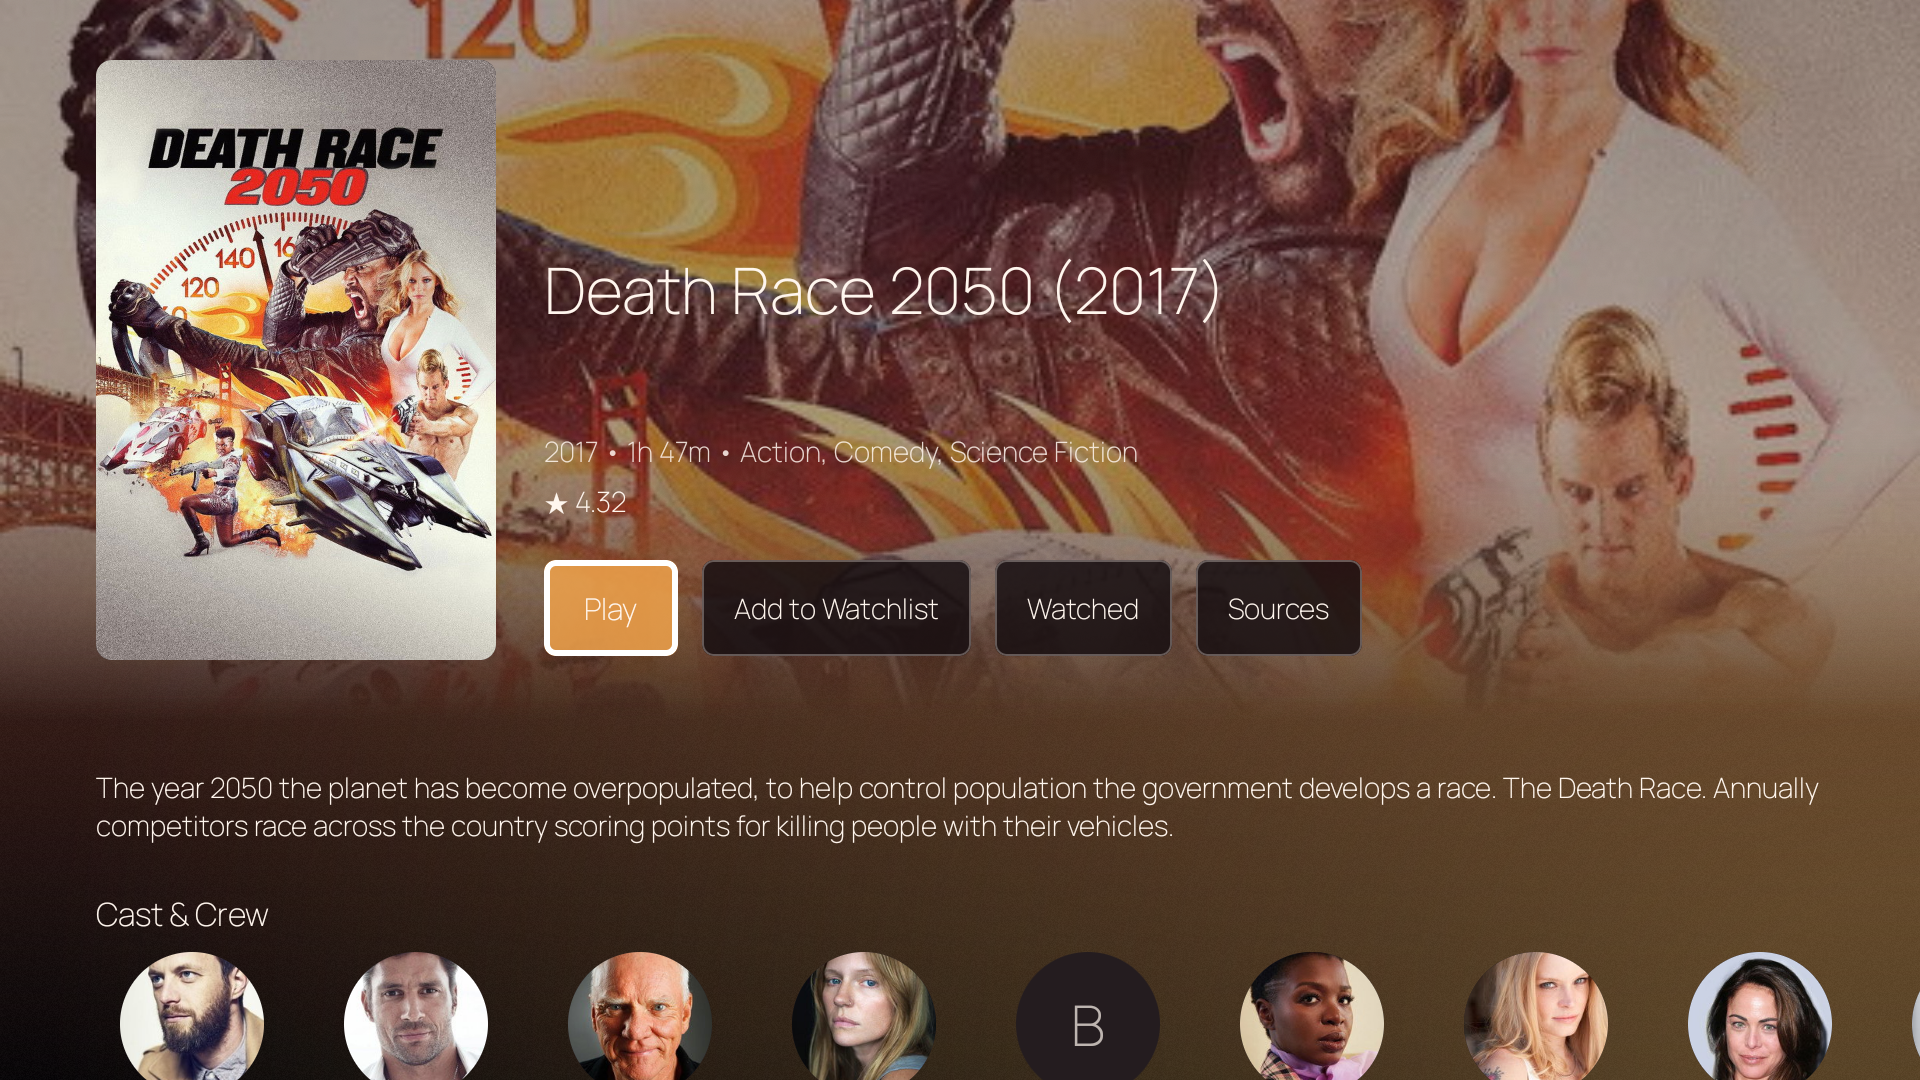
Figure 5.2 — The movie detail screen with Play, Watchlist, and Sources buttons.
Action buttons
- Play / Resume
- Starts the movie. If you watched part of it before, the button shows your saved position, for example "Resume 1:23:45".
- Add to Watchlist
- Saves this movie to your Watchlist for later. The button then changes to "On Watchlist".
- Watched / Unwatch
- Marks the movie as watched, or removes the watched status. Marking a movie as watched also removes it from your Watchlist automatically.
- Sources
- Opens a picker if more than one provider has this movie. Select the source to play from. See Section 5.7.
5.3 Browsing Series
The Series screen works like the Movies screen. The groups panel is on the left, and the poster grid is on the right. Select a series to open its detail screen.
5.4 Series Detail Screen
The series detail screen adds controls for seasons and episodes.
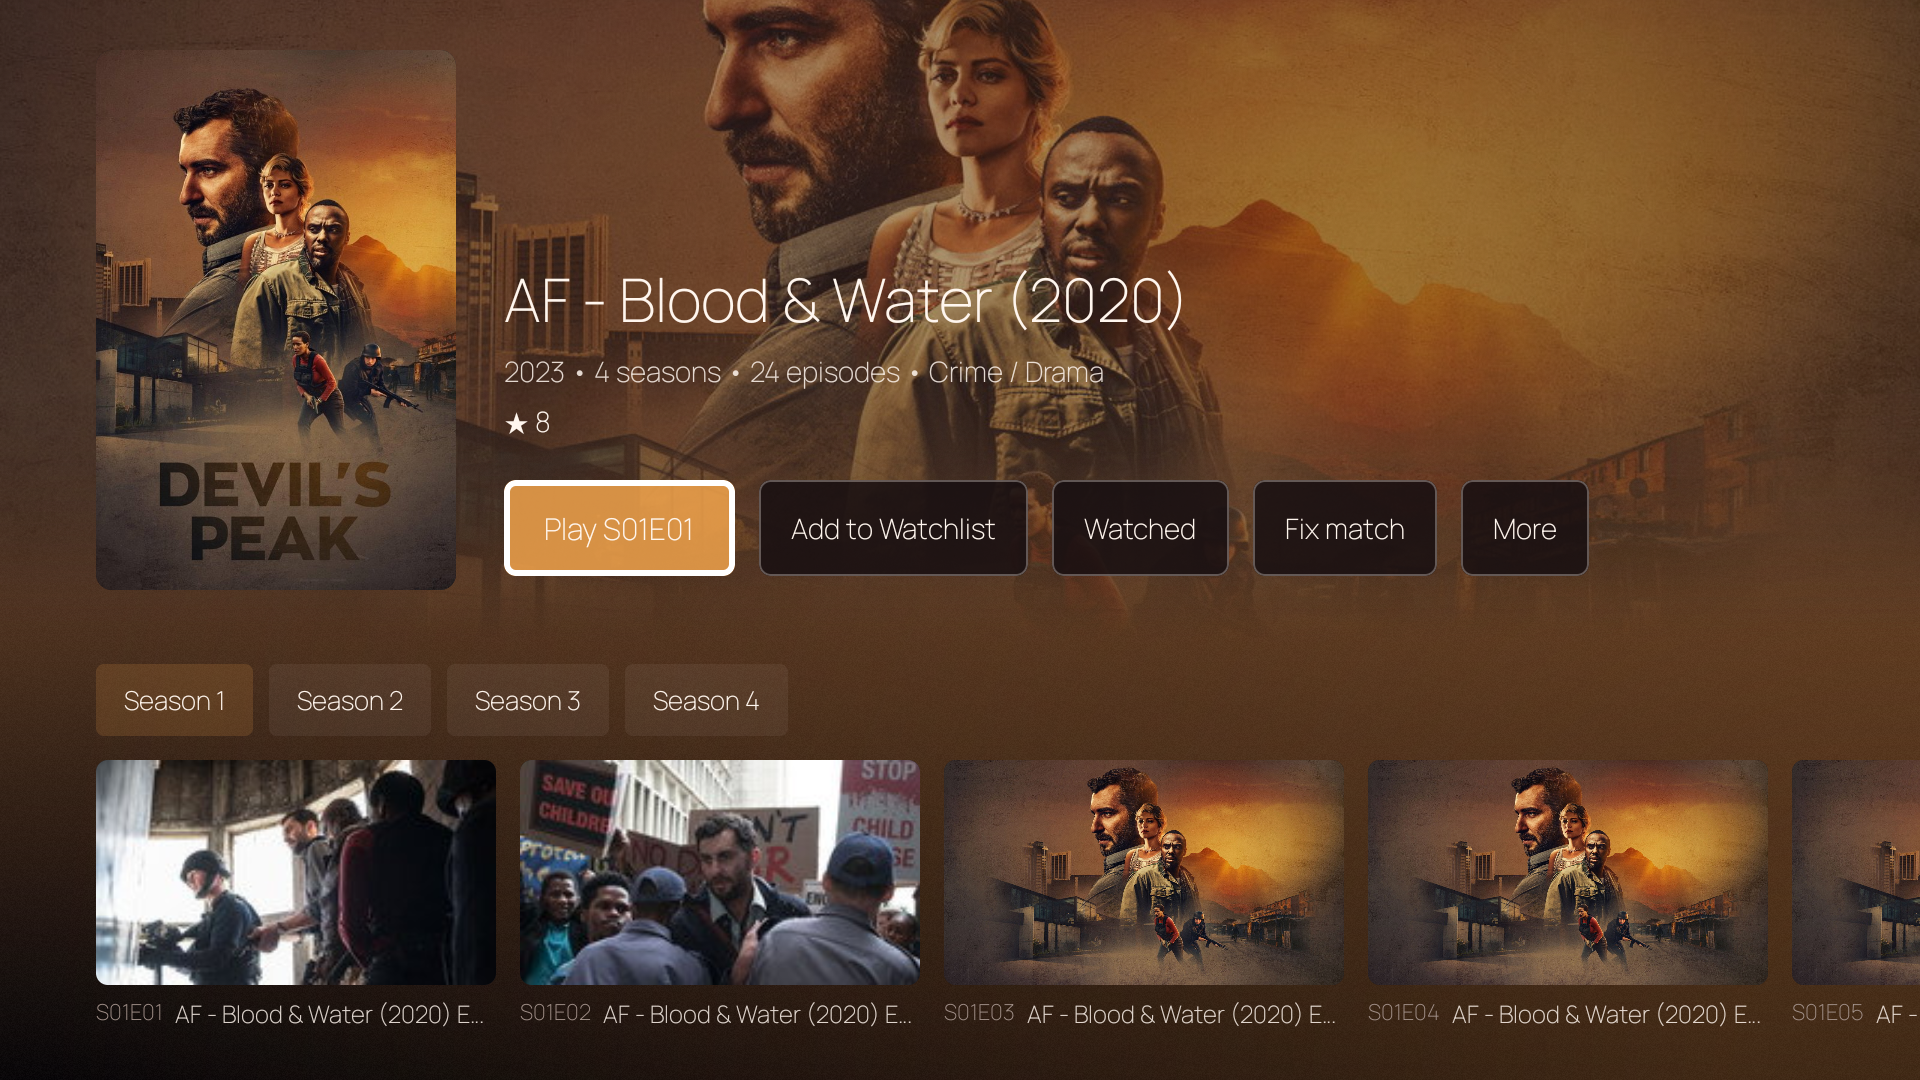
Figure 5.3 — The series detail screen with season tabs and episode thumbnails.
Seasons & episodes
Select a season, then select an episode to open it. A checkmark means every episode in a season is watched; a progress bar marks an unfinished episode.
Action buttons
- Continue: S01E03 / Play S01E01
- Continues your last unfinished episode. If you watched no episode yet, it starts the first one.
- Add to Watchlist
- Saves the complete series to your Watchlist.
- Watched / Unwatch
- Marks all episodes of the series as watched, or removes the watched status. Marking a series as fully watched also removes it from your Watchlist automatically.
Select an episode card to open the episode detail screen. It shows the synopsis of that episode and a Play button.
5.5 VOD Playback Controls
During a movie or an episode, press OK to show the player overlay. The overlay has these controls:
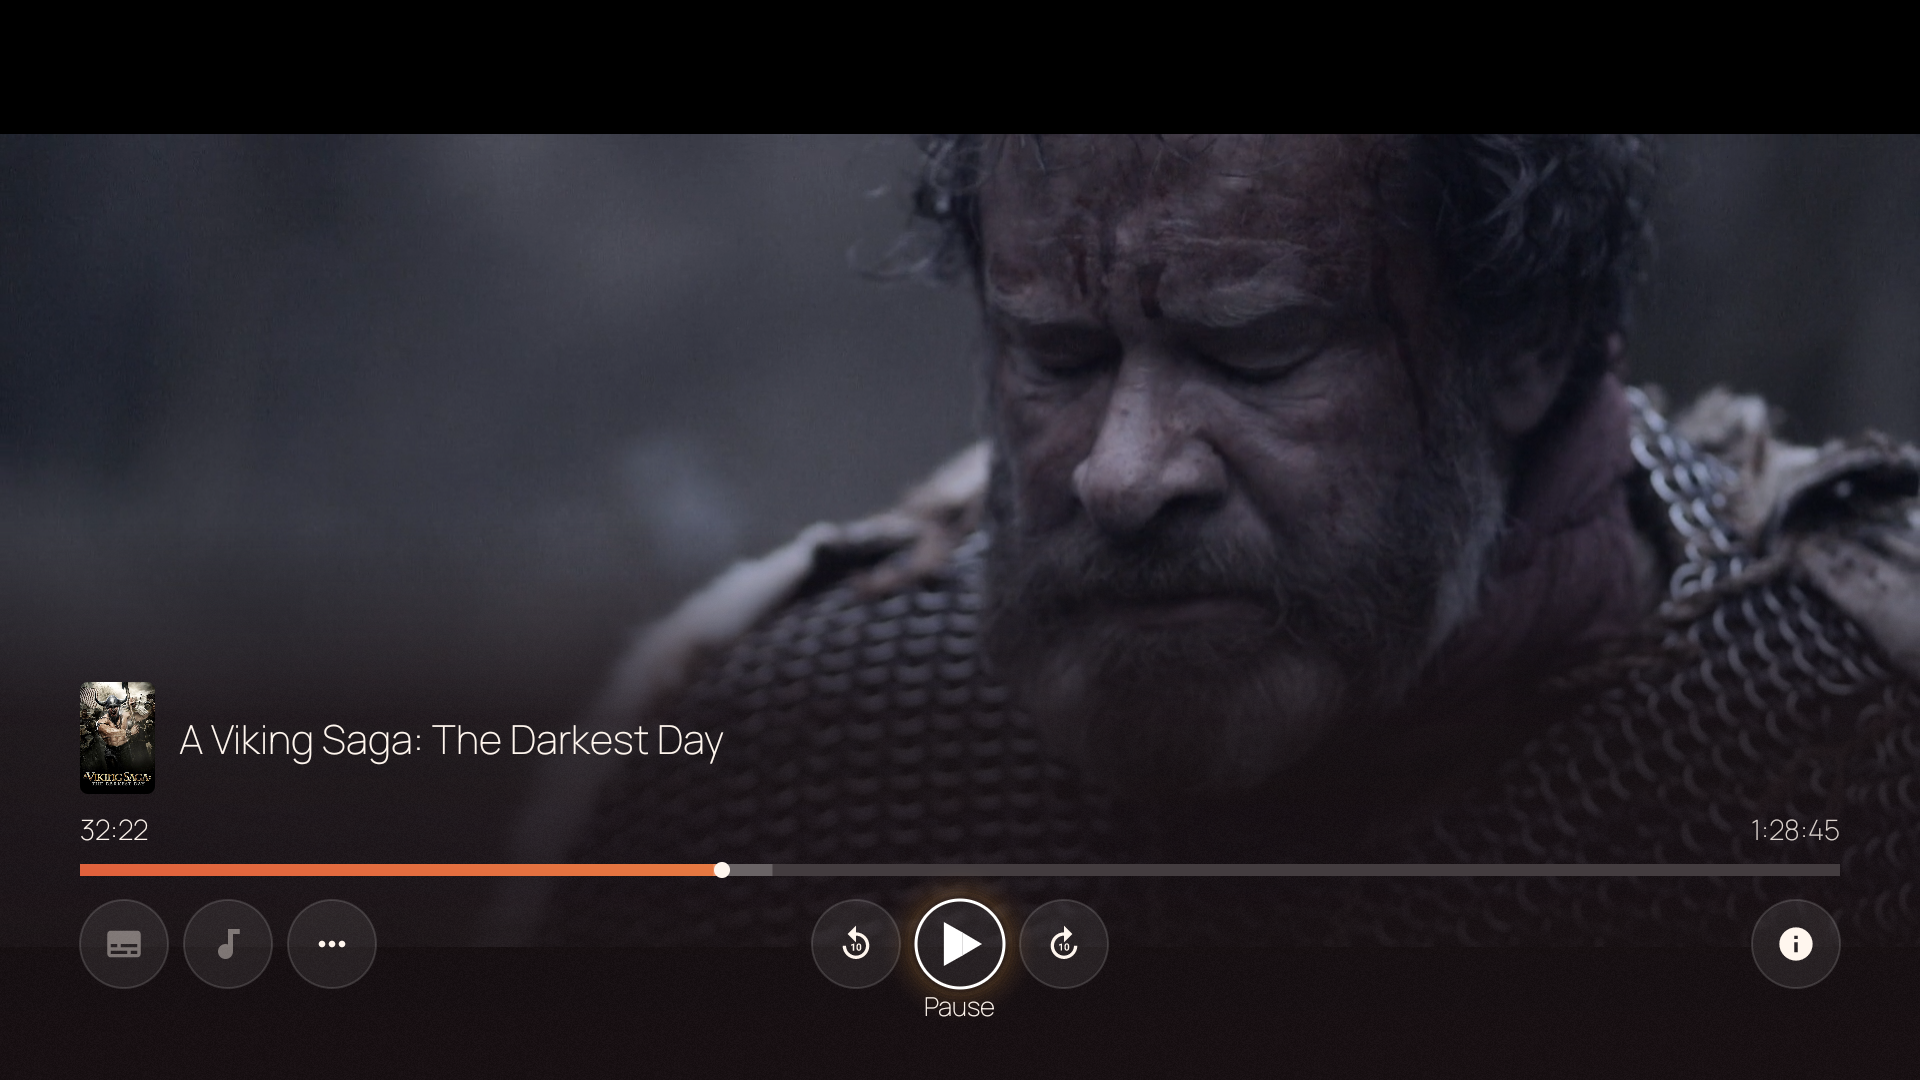
Figure 5.4 — The VOD player overlay with progress bar, skip buttons, and track selection.
| Control | What it does |
|---|---|
| OK | Plays or pauses. |
| ◀ / ▶ | Skips backward or forward by the step you set. The default step is 10 seconds. |
| Hold ◀ / ▶ | Seeks through the movie in repeated steps. The time readout shows the target position. Release the button to jump there. |
| ↑ | Opens the filmstrip seek preview with thumbnails. |
| Subtitle button | Selects a subtitle track. |
| Audio button | Selects an audio track. |
| Tools button (...) | Opens the playback tools menu: speed, A/V sync, subtitle delay, aspect ratio, and sources. |
| Favourite / Unfavourite | Adds the title to My List, or removes it. Favouriting an episode saves its series. The button is not shown on the Owner profile, which has no My List of its own. |
| Info button (i) | Shows the synopsis, the cast, and technical details such as the video format, codec, display mode, and source. Sources that carry no synopsis of their own still open the panel with the title and a Stream details entry. |
Filmstrip seek preview
While the player overlay is visible, press ↑ (Up) to open filmstrip mode. A row of thumbnails appears above the timeline, covering the part of the movie you have already watched. Press ◀ / ▶ to move through the thumbnails. Press OK to go to that position, or BACK to cancel.
Playback speed
To change the speed, open the tools menu (...) and select Playback Speed. The range is 0.25x for slow motion up to 4x. A high speed helps you finish long content. A low speed helps you see the details.
Subtitle timing offset
If the subtitles do not agree with the audio, open the tools menu and set the Subtitle Delay. A negative value moves the subtitles earlier. A positive value moves them later. The step is 50 ms. BingeBop saves the offset for that title and uses it again when you continue.
Skip intro & credits
While a movie or episode plays, a Skip intro button (bottom-left corner) appears when the opening credits start, or a Skip recap button when a previous-episode recap plays. Press OK to jump past it, or BACK to hide the button for the rest of that playback.
For series, when the end credits start the normal Next episode countdown (section 5.6) appears at that moment, a few seconds before the episode actually ends. Pressing OK there starts the next episode immediately.
The skip buttons only appear for titles that have skip-timing data in the database, and only while a recognized ID for the title is available (most catalog titles qualify). Turn the feature off in Settings → Playback → Playback Controls → Skip intro and credits (on by default).
5.6 Autoplay Next Episode
When the next-episode countdown appears, use the controls below to start immediately or cancel.
| Action | What happens |
|---|---|
| Do nothing | The next episode starts when the countdown reaches zero. |
| Press OK | Skips the countdown and starts the next episode immediately. |
| Press BACK | Cancels the countdown and keeps the finished episode on the screen. |
Autoplay is on by default. To turn it off, or to change the countdown to 5, 10, or 15 seconds or to "Immediately", open Settings → Playback → Playback Controls.
5.7 Multiple Sources & Deduplication
If you use several IPTV providers, the same movie can appear more than once. The copies can have a different quality or different audio tracks. Different versions of the same title are grouped under one entry and are available from Sources.
A title with several sources shows the Sources button on its detail screen. Select the button to see all versions:
- Auto
- Auto chooses an available source that suits your Preferred Quality setting (Settings → Playback → Preferred Quality). The preferred quality can be set to Auto (matches your display), SD, HD, FHD, or 4K.
- Specific source
- Pins the version of one provider. Use this if only that provider has the audio language or the quality you want.
Sometimes BingeBop merges two different movies with similar names. To correct this, press ▶ (Right) on a source in the picker and select "Treat as separate title". The source then becomes its own entry.
5.8 Watchlist
The Watchlist is your personal "watch later" list. To add a movie or a series, open its detail screen and select Add to Watchlist.
The Watchlist screen shows all saved titles in a grid. The same titles also appear as a rail on the Home dashboard. BingeBop removes a title when you watch it completely. To keep watched titles, turn off Settings → Content → Auto-remove watched from Watchlist.
Each profile keeps its own Watchlist.
5.9 Home Dashboard
The Home dashboard collects content from the whole app on one screen. It shows the content in horizontal rails:
- Channels — live channel tiles. Select a tile to tune to that channel.
- Continue Watching — movies and episodes you started but did not finish, newest first. Select one to continue at your saved position.
- Watchlist — your saved titles.
- Recently Added Movies — new movies in the catalog of your provider.
- Recently Added Series — new series in the catalog.
BingeBop hides a rail that has no content. To select the rails and their order, use the "Customize rows" link at the bottom of the Home screen. You can also open Settings → Content → Home Rows.
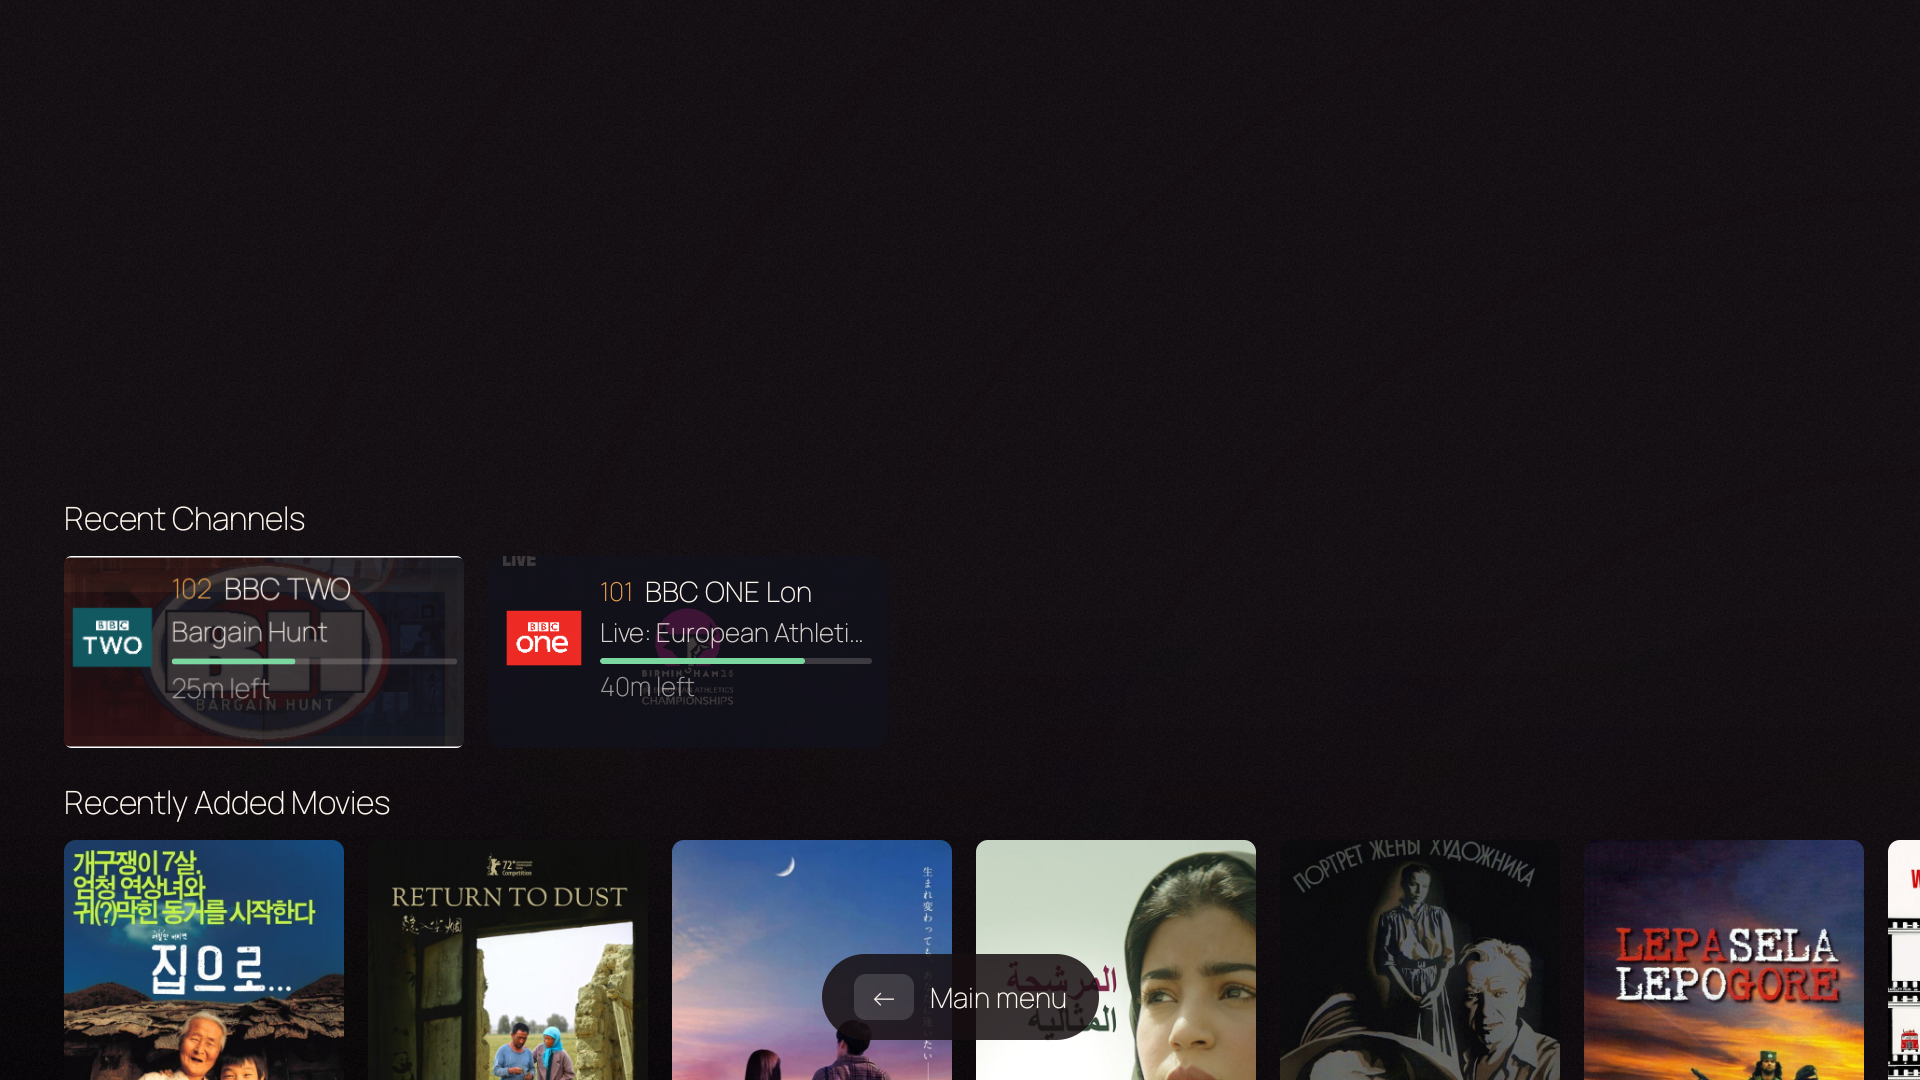
Figure 5.5 — The Home dashboard with a Channels rail.
5.10 Resume & Watch Progress
BingeBop saves your playback position automatically. If you stop a movie or an episode before the end, BingeBop keeps the position for your profile and syncs it to your cluster devices. The next time you open the title, the Play button shows "Resume" with your saved time.
BingeBop follows your progress at three levels:
- Per episode — a progress bar on the episode card shows your position.
- Per season — a checkmark on the season chip appears when you watched all episodes.
- Per title — the "Watched" status on the detail screen.
Timeshift & Catch-up
Pause and rewind live TV, and move back through the part you already watched. Some providers also let you browse and play shows from the last several days.
6.1 Pausing Live TV
During live playback, press OK to show the player overlay. Then select the Pause button. When you resume, playback continues from the point where you paused.
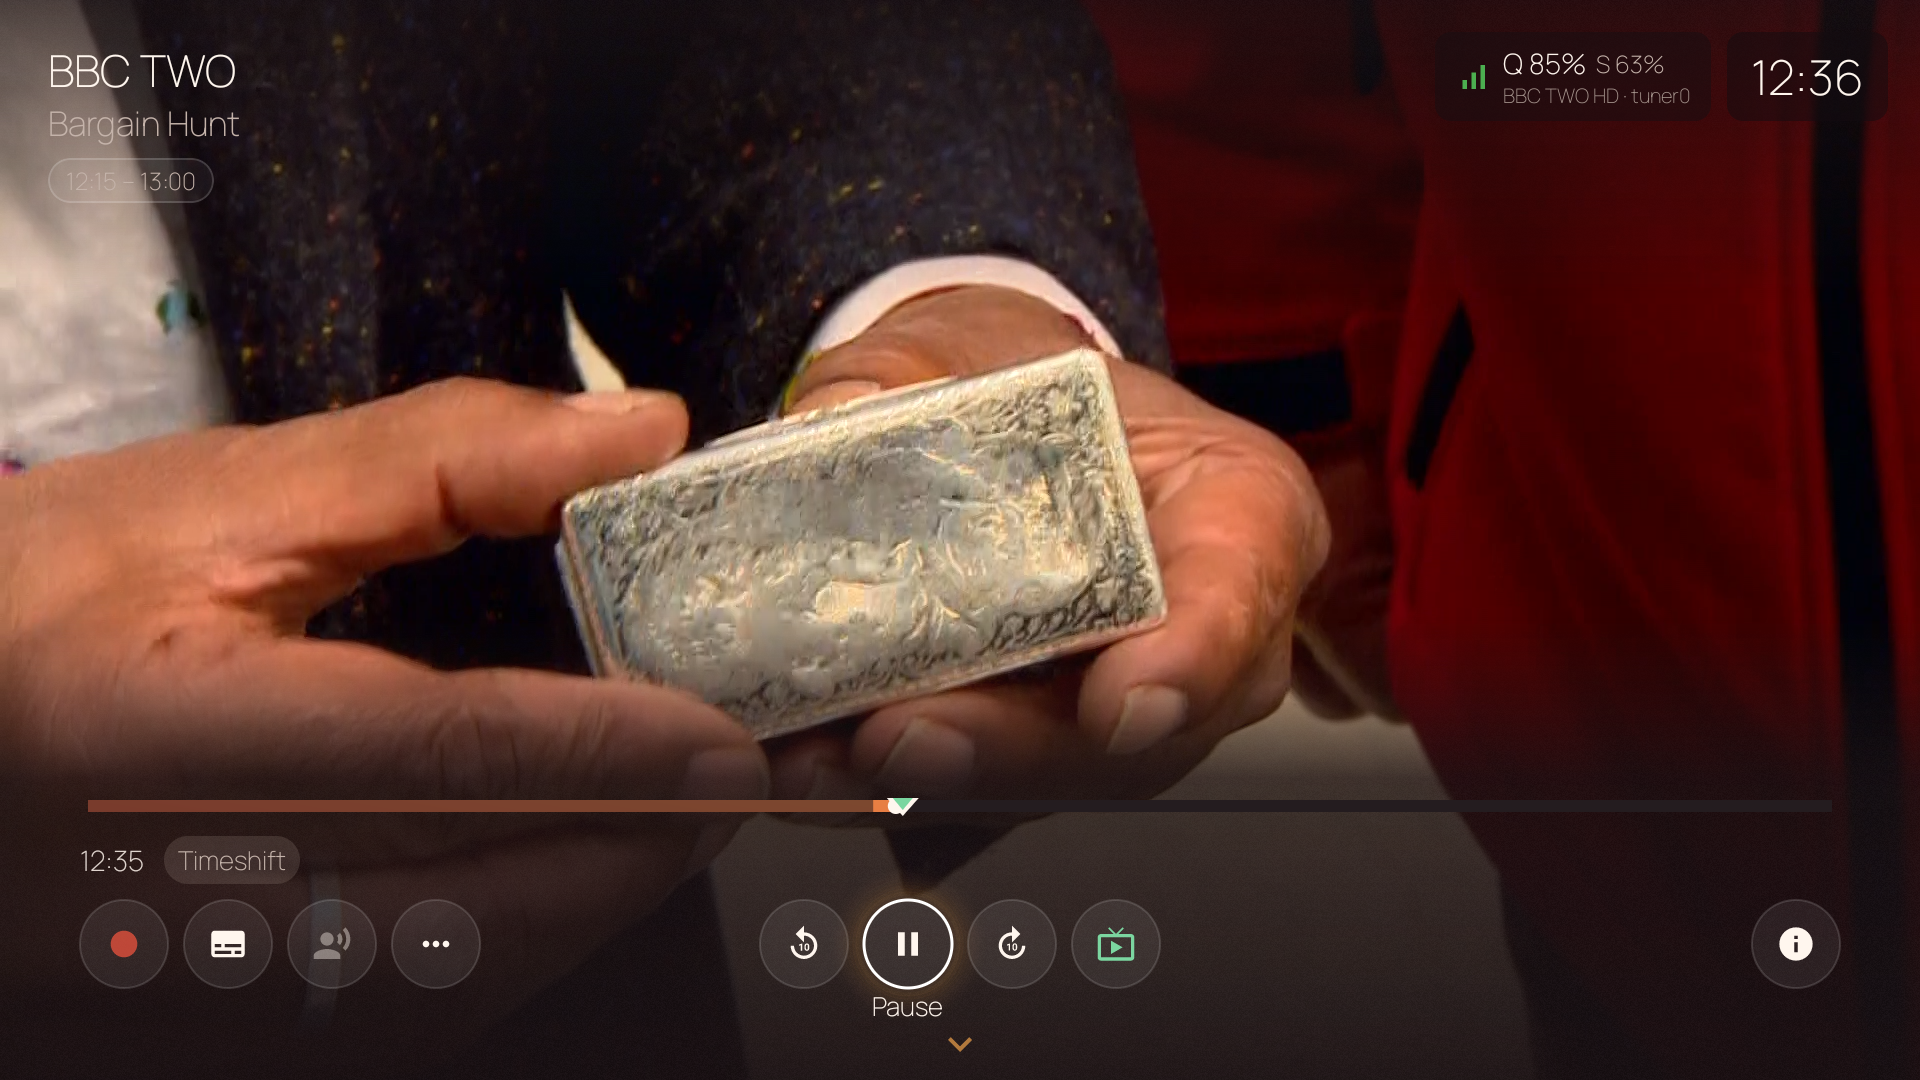
Figure 6.1 — The player overlay in timeshift mode. The seek bar shows your position behind the live edge, and the badge reads "Timeshift".
6.2 Seeking Through Live TV
When you pause or seek back, you can move through the part of the broadcast you have already watched.
| Action | How |
|---|---|
| Skip back / forward | While the overlay is visible, press ◀ / ▶. Each press skips by the step you set. The default step is 10 seconds. |
| Move quickly | Hold ◀ / ▶ to seek through the buffer in repeated steps. Release the button to jump to the preview position. |
| Thumbnail seek | Press ↑ (Up) to open filmstrip mode. A row of thumbnails from the buffer appears. Move with ◀ / ▶, then press OK to go to that position. |
6.3 Jumping Back to Live
When you are behind the live edge, the player overlay shows a "Go to live" button. Select it to return to the live broadcast immediately.
6.4 Catch-up Browser
Some providers keep the shows of the last several days on their server. With such a provider you can watch old shows, not only what is in your local buffer. Xtream Codes and Stalker providers with a catch-up archive support this.
To open the catch-up browser, press ▶ (Right) during live playback. You can also open it from the sidebar.
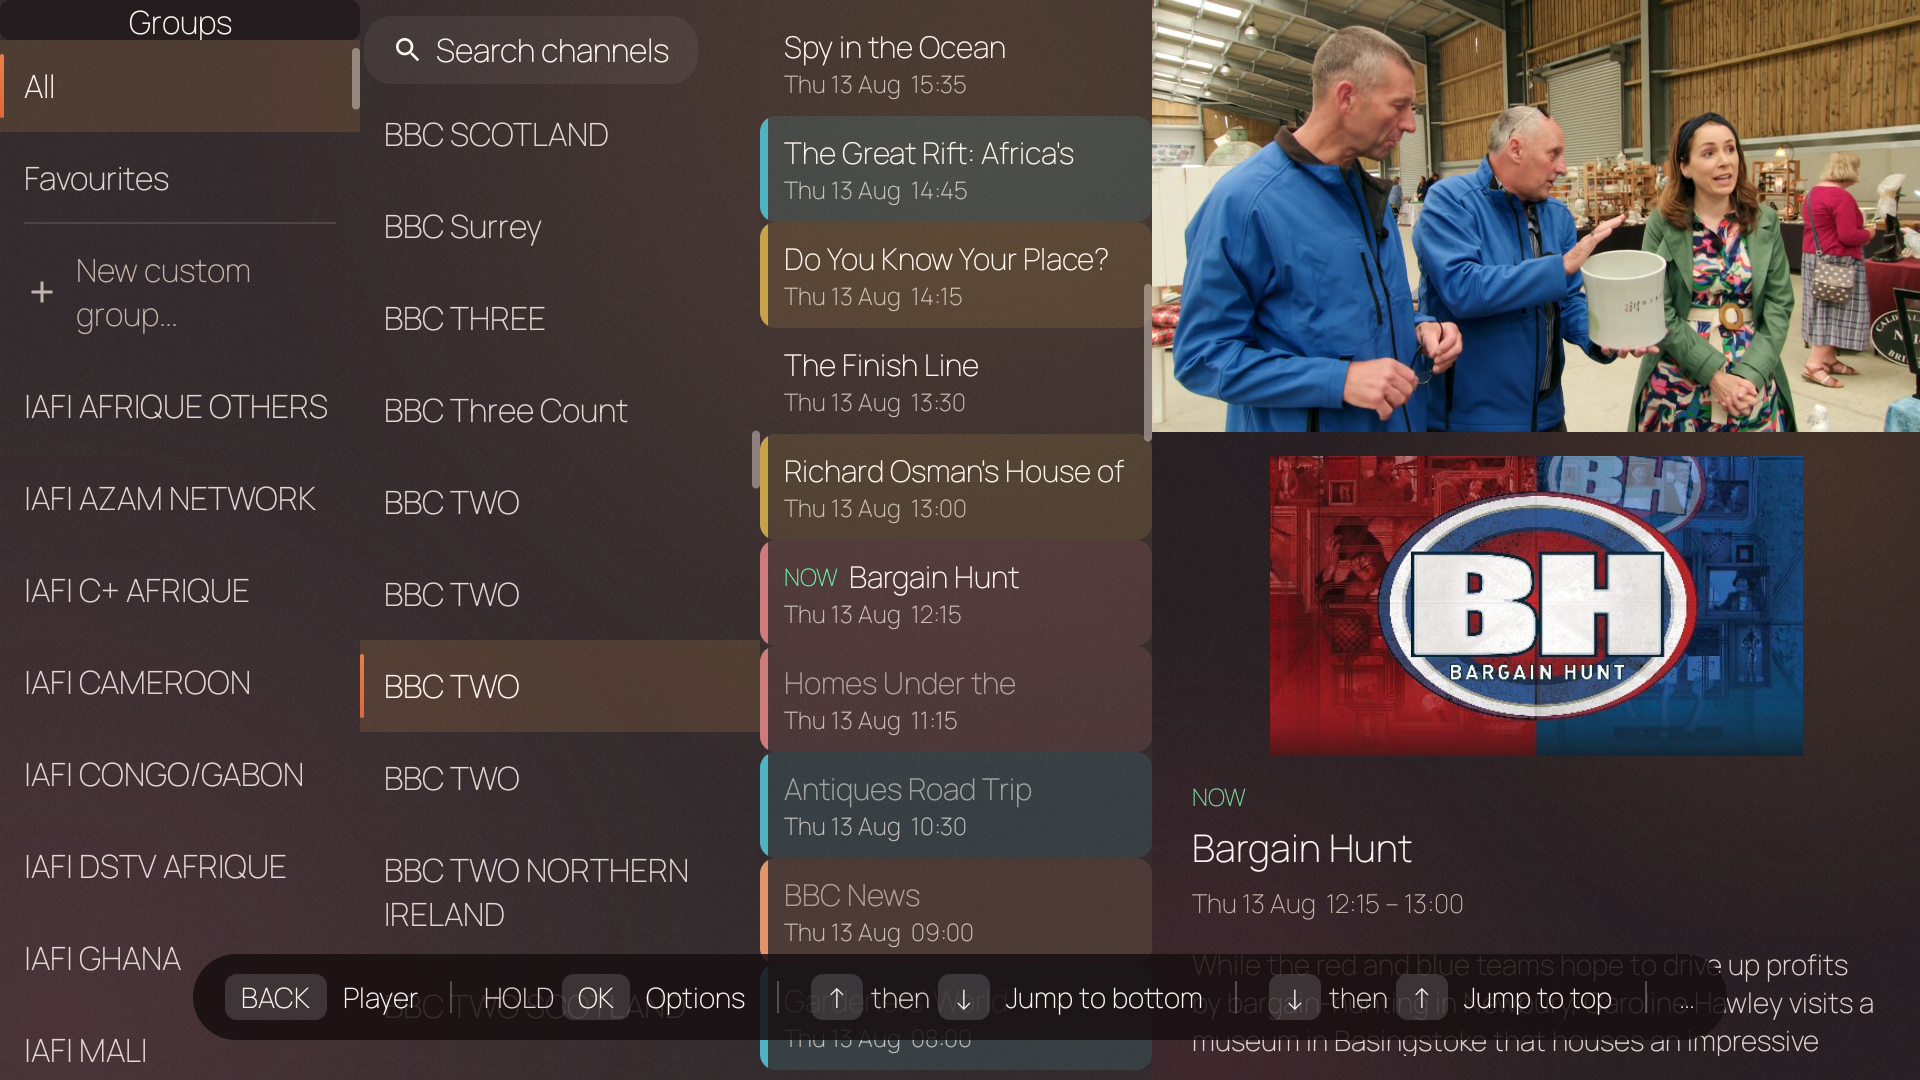
Figure 6.2 — The catch-up browser: groups on the left, channels in the middle, past programmes on the right.
Choose a group, select a channel, then select an old programme to play it. Only channels with catch-up appear.
6.5 Timeshift Settings
Timeshift works on most devices without configuration. These settings change its behaviour:
- Storage destination
- By default, BingeBop chooses storage automatically, using a removable drive when one is available and app storage otherwise. To choose a specific location, see Chapter 10: Storage.
- Timeshift storage limit
- Settings → System → Storage. Choose a maximum amount of space for the current live-pause destination, or No limit. When the limit is reached, BingeBop removes the oldest buffered segments. The normal rewind window is about three hours; a smaller size limit can make it shorter. The change takes effect when you next tune to a channel.
Recording & Reminders
Record live TV and watch it later, plan recordings in advance, and set reminders. A reminder can tune to a channel automatically when a show starts.
7.1 Recording from the Player
The fastest way to start a recording is from the player overlay during live TV. Press OK to show the overlay, then select the Record button. It is the red circle on the left.
A menu opens. Its options depend on the available information.
When programme info is available (EPG)
- Record from now
- Starts the recording at this moment.
- From the start of the programme
- Starts the recording at the scheduled start time of the show. If the live-pause buffer is shorter than that, BingeBop starts at the oldest point in the buffer.
When no programme info is available
The menu offers durations instead: Stop in 30 / 60 / 90 / 120 / 180 min. If you watched the channel for some time and a buffer exists, one more option appears: "Record from when I tuned in", with the same durations. This option saves the part you already watched and the time that follows.
Custom schedule
At the bottom of the menu, select "Schedule a recording...". A wizard opens for a single recording or a repeated recording. In the wizard, select the days, the time, and the duration. See Section 7.3.
7.2 Recording from the Channel Guide
You can also record any show in the Channel Guide, including a show in the future:
- Open the Channel Guide and highlight the show.
- Hold OK to open the context menu.
- Select Record.
- A confirmation dialog appears. Select one option:
- Record — records this broadcast only.
- Record series — records every future broadcast of this title on this channel.
- Cancel — closes the dialog without a recording.
The cell of a scheduled show then shows a red dot in the guide. A recording in progress shows a flashing red dot.
7.3 Custom Recording Schedules
Use the custom schedule wizard if the guide has no entry for the show. It is also the correct tool for a recording that repeats at a fixed time.
The wizard has these settings:
- Repeat
- Select Recurring to repeat on the days you select, or Once for a single recording.
- Days (recurring)
- Select the days of the week, or use a preset: Daily, Weekdays, or Weekend.
- Date (one-time)
- Select a day: Today, Tomorrow, or a later date.
- Hour & Minute
- Sets the start time. The minutes change in steps of 15.
- Duration
- Sets the length of the recording: 30, 60, 90, 120, or 180 minutes.
7.4 Recording Settings
- DVR destination
- Sets where BingeBop saves the recordings. See Chapter 10: Storage.
- Pre-padding
- Starts the recording early, so that you keep the beginning of the show. The options are 0, 30 seconds, 1 minute, 2 minutes, and 5 minutes.
- Post-padding
- Continues the recording after the scheduled end time. The options are the same. The default is 2 minutes, because shows often end late.
7.5 The Recordings Library
The Recordings screen has three tabs:
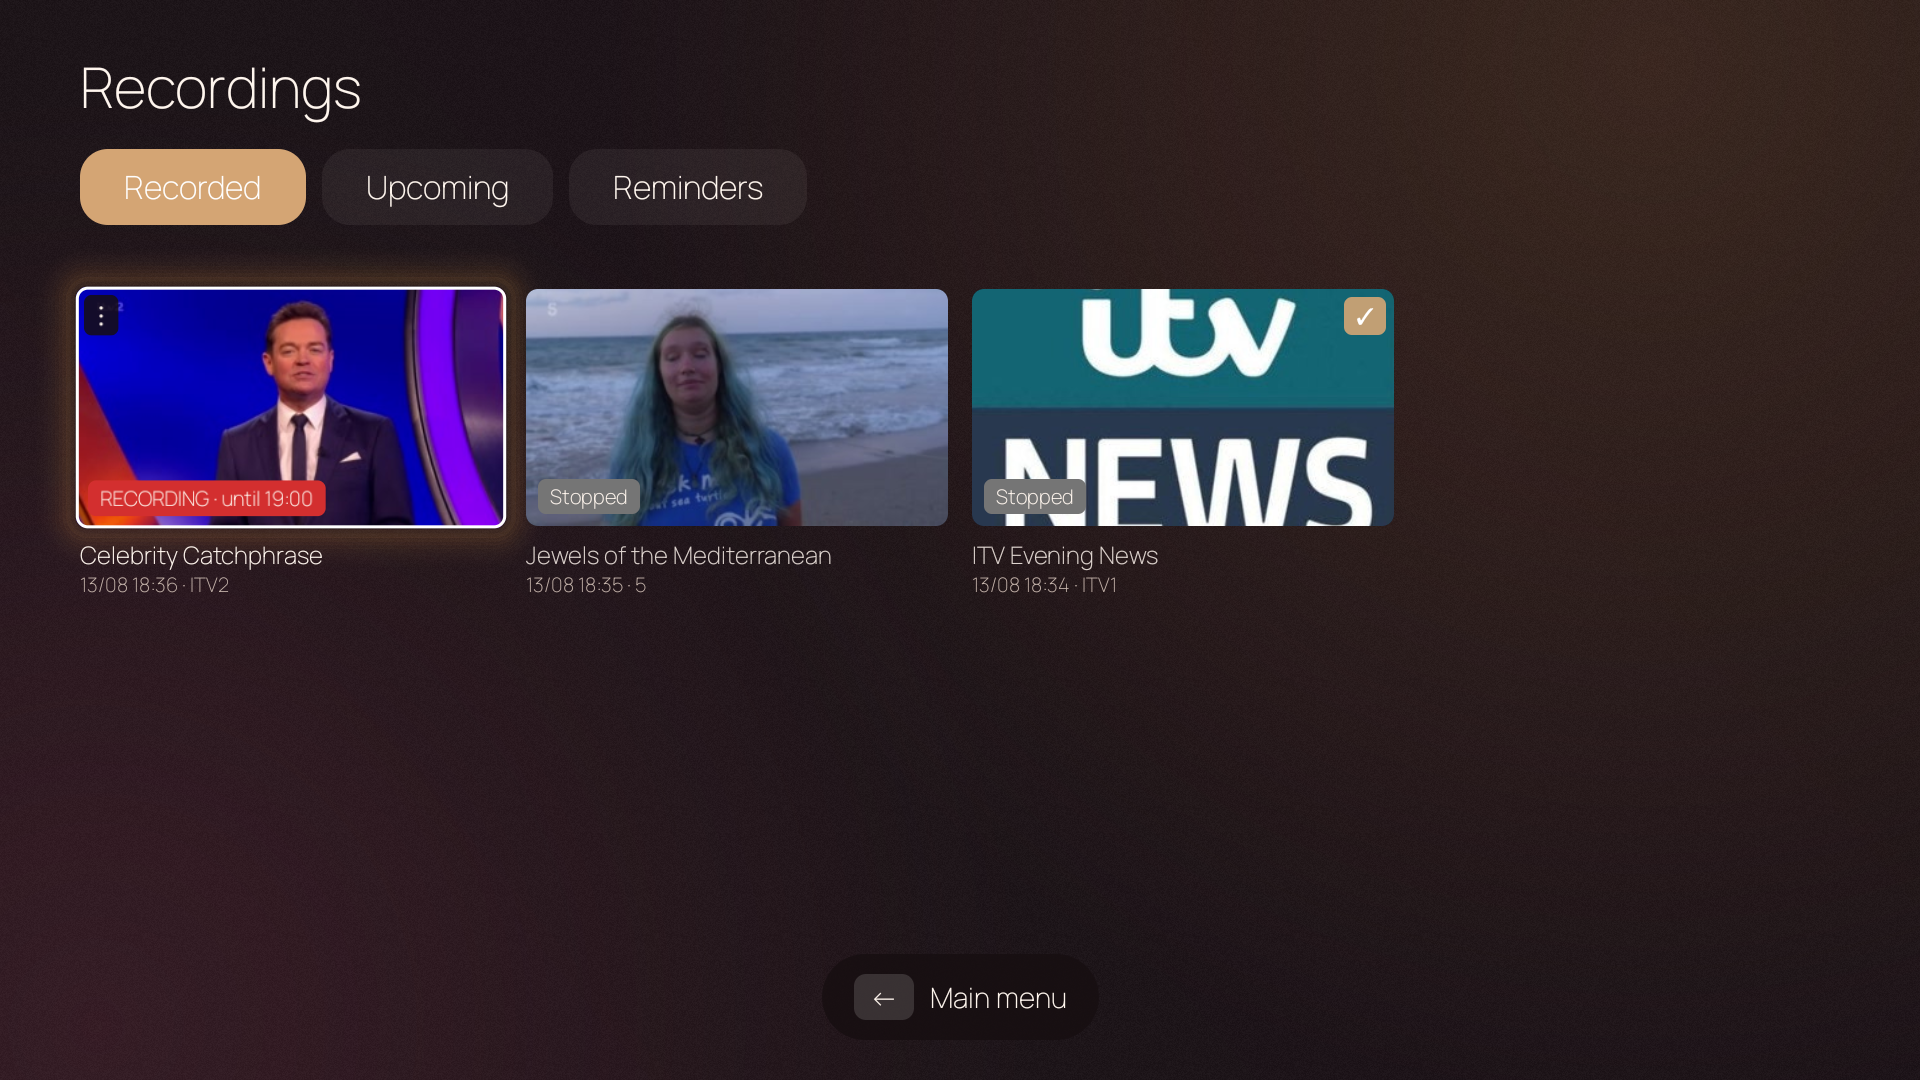
Figure 7.1 — The Recordings screen with its three tabs.
Recorded
Your finished recordings. A series recording uses one card with the number of episodes. Select the card to see the episodes. A profile name identifies a recording created by another household member.
A pill on a card marks a special state: "RECORDING" for a recording in progress, "STOPPED", "FAILED", or "WAITING FOR TUNER". A recording you watched shows a checkmark. A recording you started shows a progress bar.
Select a recording to play it. Hold OK to open a context menu with Play, Stop recording for a recording in progress, and Delete. Only the profile that created a recording, or the household admin, can delete it.
Upcoming
A list of the recordings that did not start yet. Each entry shows its type — single, series, or custom schedule — and the next date and time.
To cancel a scheduled recording, select the entry and confirm. BingeBop keeps the material it already recorded. It cancels the future recordings only.
Reminders
A list of your active reminders. Each entry shows its type — single or series — and the time of the next occurrence. Select an entry to remove the reminder.
7.6 Playing a Recording
A recording uses the same player controls as a movie. See Chapter 5 for the seek bar, the skip buttons, the filmstrip thumbnails, the speed control, and the track selection. BingeBop saves your playback position automatically.
A recording made on another device is available while that device or its shared storage is online.
7.7 Reminders
A reminder tells you when a show is about to start. It can also change to that channel automatically.
Setting a reminder
- In the Channel Guide, highlight a show that starts later.
- Hold OK to open the context menu.
- Select Set reminder.
- Select This programme for one reminder, or Whole series for a reminder before every future broadcast of this title on this channel.
A show with a reminder shows a bell icon in the guide.
When a reminder fires
When the reminder countdown appears, use the actions below to switch immediately, wait for the automatic switch, or cancel.
| Action | What happens |
|---|---|
| Do nothing | BingeBop tunes to the channel when the countdown reaches zero. |
| Press OK | Tunes to the channel immediately. |
| Press BACK | Closes the card and keeps the current channel. |
Managing reminders
The Reminders tab on the Recordings screen lists your reminders and lets you remove them. You can also hold OK on the show in the Channel Guide and select Remove reminder.
7.8 Recording from Catch-up
If your provider has catch-up (see Chapter 6), you can record a show that already aired. The show is then yours permanently, and the provider can remove it from the archive.
Open the catch-up browser, select an old show, and start playback. Then select the Record button in the player overlay. Two options appear:
- From the start of the programme
- Records the complete show from its scheduled start time.
- Record from now
- Records from your current playback position forward.
Multi-View & Picture-in-Picture
Watch two live channels at the same time. One channel fills the screen. The other plays in a small inset in a corner. This is useful for a second match or a news broadcast.
8.1 Starting PiP
There are three ways to open a second channel in PiP:
- Hold ↑ (Up) during live playback
- This is the fastest way. Hold Up for about one second to turn PiP on or off. BingeBop puts your previous channel in the inset.
- From the Channel Guide
- Hold OK on a channel in the guide and select "Watch in picture-in-picture". That channel opens in the inset, and your current channel continues to play.
- From the player overlay
- Press OK to show the overlay. Open the tools menu (...) and select "Picture-in-picture".
Figure 8.1 — PiP mode: the main channel fills the screen while a second channel plays in the bottom-right corner.
8.2 Controlling PiP
While PiP runs, the default controls are (you can change these in Settings → Accessibility → Remote Control & Shortcuts):
| Gesture | Action |
|---|---|
| Hold ↑ | Close PiP — stops the second channel and returns to full screen. |
| Hold ▶ | Swap — the inset channel becomes the main channel, and the main channel moves into the inset. |
| Hold ↓ | Move the inset — moves the inset to the next corner, in this order: bottom-right, bottom-left, top-left, top-right. BingeBop keeps your preferred corner. |
| Hold OK | Change focus — moves control between the main channel and the inset. Channel-switching controls affect the focused tile without changing the audio. |
| Hold ← | Change audio — switches the sound between the main channel and the inset without changing which tile you control. |
8.3 Tuner & Connection Limits
PiP requires a free tuner or an additional provider connection. If none is available, PiP cannot start.
- With an HDHomeRun, PiP uses a free tuner. If all tuners are busy with other devices or with recordings, no tuner is free.
- With an IPTV provider, PiP opens a second connection. Most providers tolerate two connections briefly, so PiP usually works even on a single-connection plan. If your provider drops the extra connection, one of the two channels will stop.
8.4 Live Preview While Browsing
Opening the sidebar, Guide, or Settings does not stop live TV.
This behaviour is automatic and has no setting. The video plays while you stay on a live channel. It stops only when you start a movie or leave the app.
8.5 QR Stream Handoff
BingeBop can show a QR code on the TV screen. Scan it with your phone to continue the same live channel in the browser of your phone. No app is necessary.
- While you watch a live channel, press OK to show the player overlay.
- Open the tools menu (...) and select "Watch on phone".
- A QR code appears. Connect your phone to the same Wi-Fi network, then scan the code with its camera.
- The channel opens in the browser of your phone.
Watching through QR handoff does not use an additional provider connection. The phone keeps the channel from the moment you scanned the code, even if the TV changes to another channel later.
The stream continues while your phone plays it. If you lock the phone, close the browser tab, or lose Wi-Fi, BingeBop ends the session after about one minute.
Search
Find everything in your library from one screen: channels, movies, series, and the shows that are on now.
9.1 Using Search
Open Search from the sidebar menu.
Results appear as you type. Search covers live channels, current and upcoming programmes, movies, and series. Select a result to tune to it or open its details.
A channel can also be found by the name supplied by its provider. When this happens, its card keeps the channel’s usual title and shows Matched stream: … underneath, so you can see which provider stream matched.
Add-ons you connected are searched with the same term. Each add-on catalogue that answers appears as its own rail below the library results, titled with the add-on and its catalogue name. Those rails arrive a moment after the library results, because they come from the add-on over the network; while they are still on their way you see a loading indicator instead of "No results". Select a hit to open its details, where you can see its sources.
A catalogue is only searched when it offers a search. Catalogue hits are never merged with your library results, and the same title offered by two add-ons appears once per add-on.
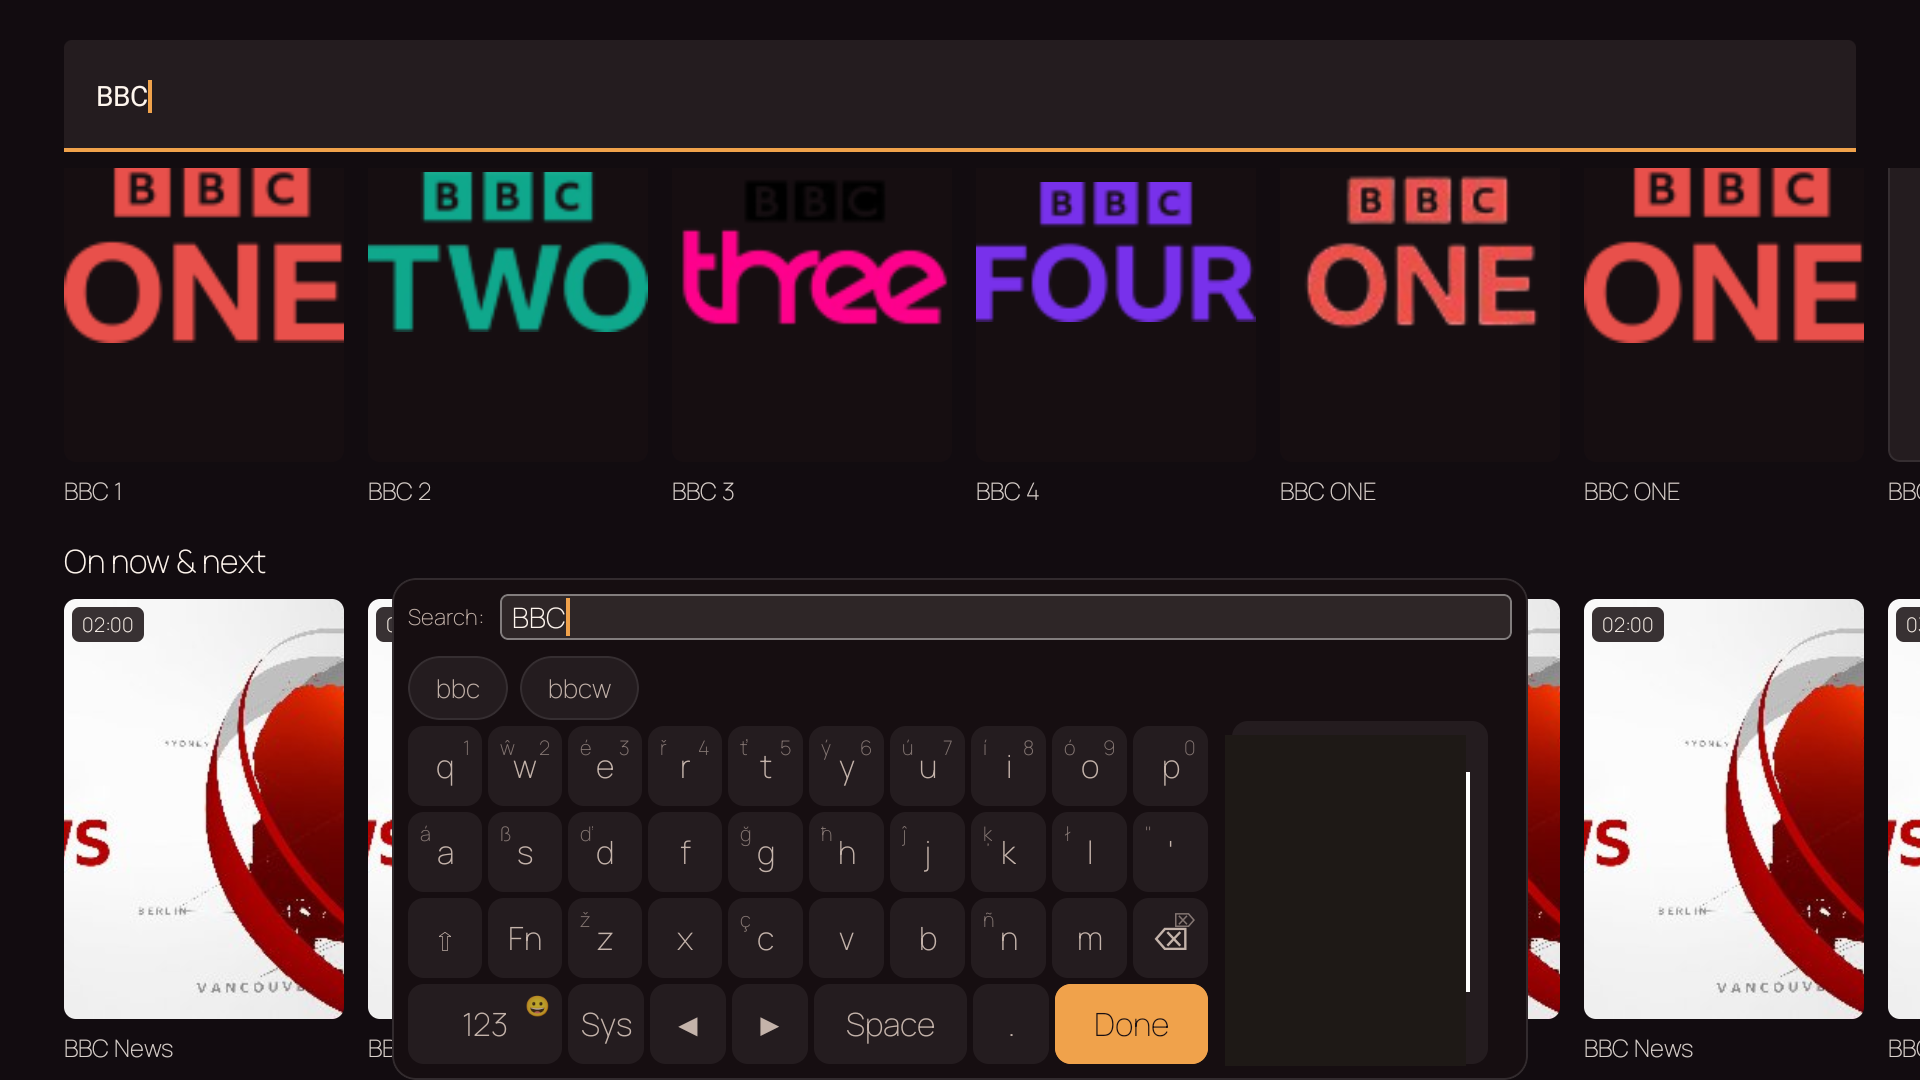
Figure 9.1 — Search results for "BBC": matching channels in the top rail, currently airing programmes below.
9.2 Typing with the On-Screen Keyboard
The BingeBop keyboard is made for a D-pad. Each key shows a main character and an accented character. For example, the "e" key also shows "é". To enter the accented character, hold the key.
| Key | Function |
|---|---|
| 123 | Changes to numbers and symbols |
| Fn | Shows function keys and special characters |
| Sys | Changes to the system keyboard of Android |
| ◀ ▶ | Moves the cursor in the text field |
| ⌫ | Deletes the character before the cursor |
| Done | Closes the keyboard and moves to the results |
Multi-script support
Your content can contain channels or titles in Cyrillic, Greek, or Arabic. To add these scripts to the keyboard, open Settings → Accessibility → Keyboard Scripts. A globe key then appears on the keyboard. Select it to change the script.
Storage
BingeBop uses storage for the live pause buffer, for recordings, and for the VOD cache. You can use the storage of the device, a USB drive, or a network share. Each function can write to a different destination.
10.1 Storage Roles
The Storage use area at the top of the Storage panel shows the destination of each function:
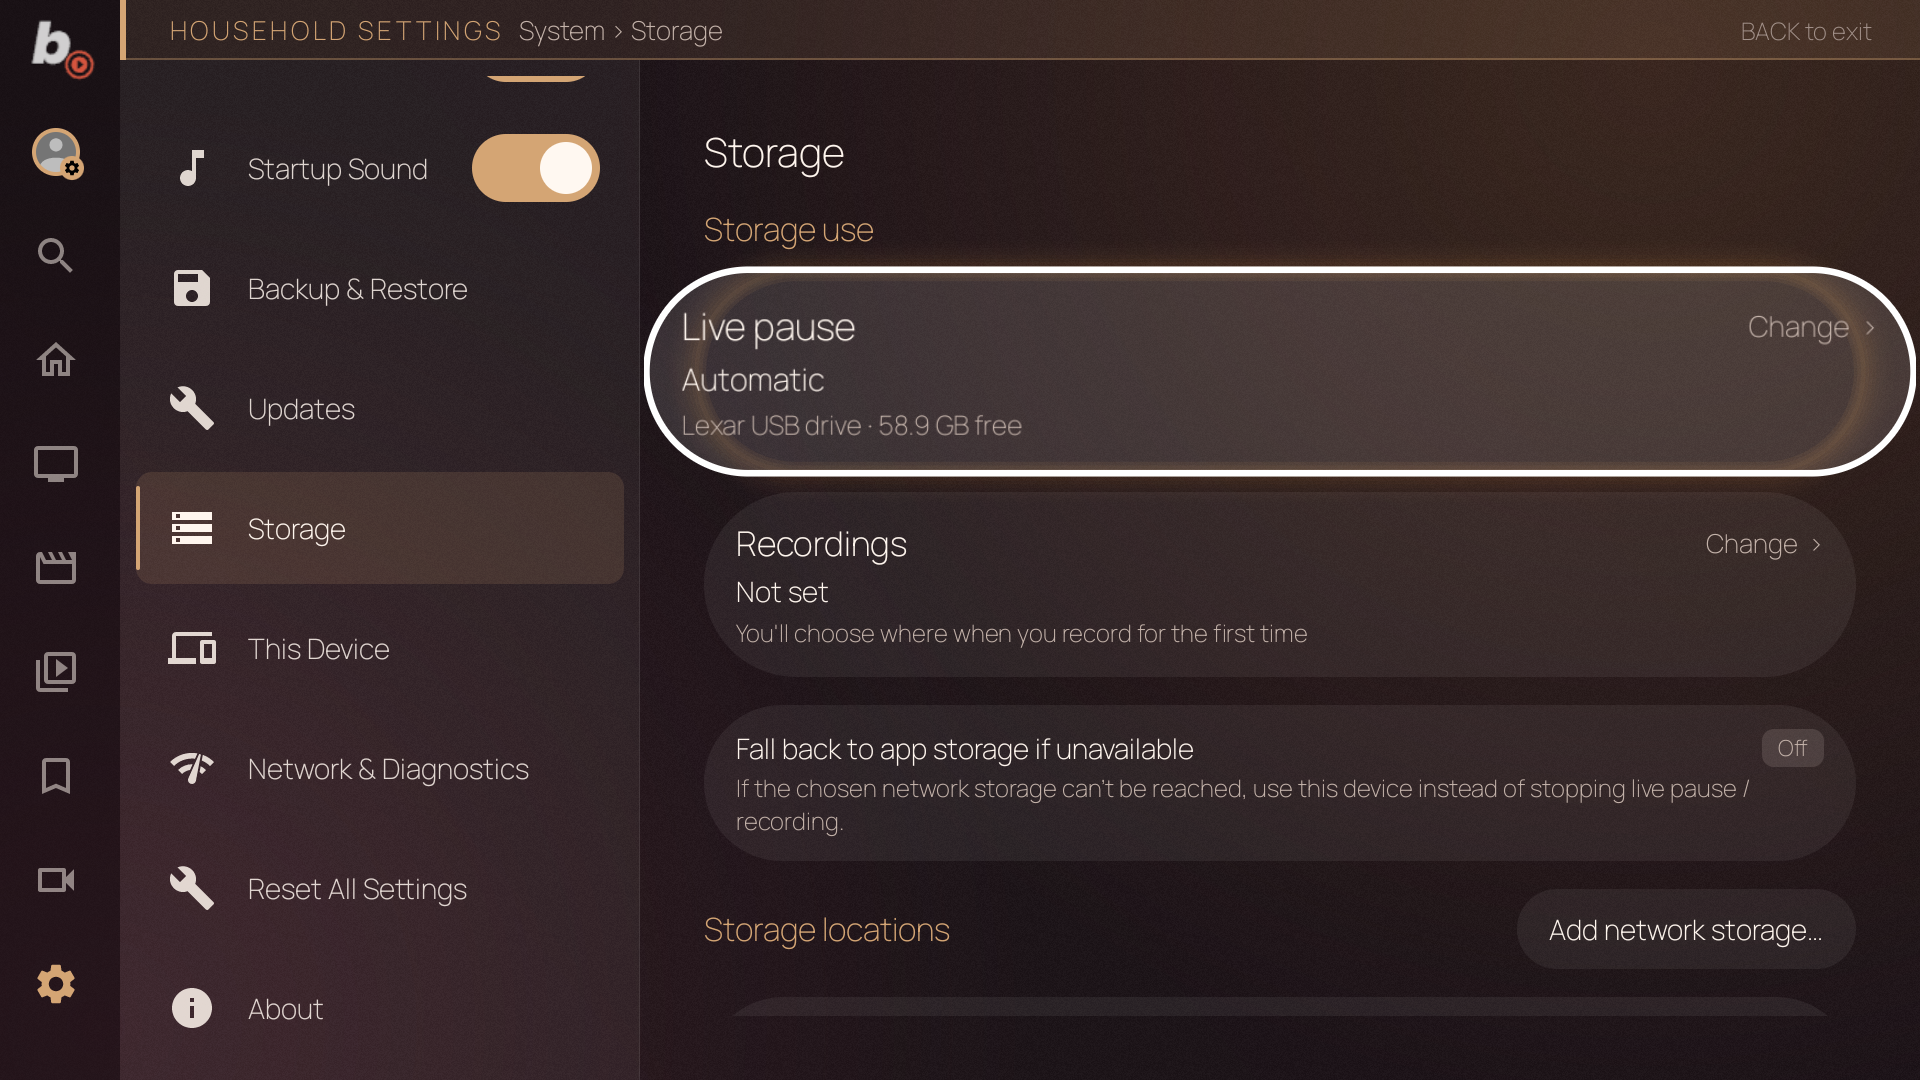
Figure 10.1 — Storage roles: each feature can write to a different destination.
- Live pause
- The destination of the live timeshift buffer. The default is Automatic. BingeBop then selects the best destination, and it prefers a USB drive to internal storage for speed and space. To use one fixed location, select Change. Changing this destination clears BingeBop's old live-pause sessions on the previous destination, so any rewind history there is no longer available. Recordings and other files are not removed.
- Recordings
- The destination of your DVR recordings. It shows "Not set" until your first recording, because BingeBop asks for a destination at that moment. You can also set it here in advance.
When live pause uses internal storage, BingeBop automatically reduces its buffer before Android reports low storage. The available rewind time can become shorter temporarily and grows again after free space recovers.
Network fallback
A switch below the roles reads "Fall back to app storage if unavailable". Turn it on to protect your recordings and your live pause buffer. If BingeBop cannot reach the network storage, it then writes to the local storage of the device. The switch is off by default.
10.2 Storage Locations
The Storage locations section lists every destination that BingeBop can write to, on this TV and on the other TVs in your cluster.
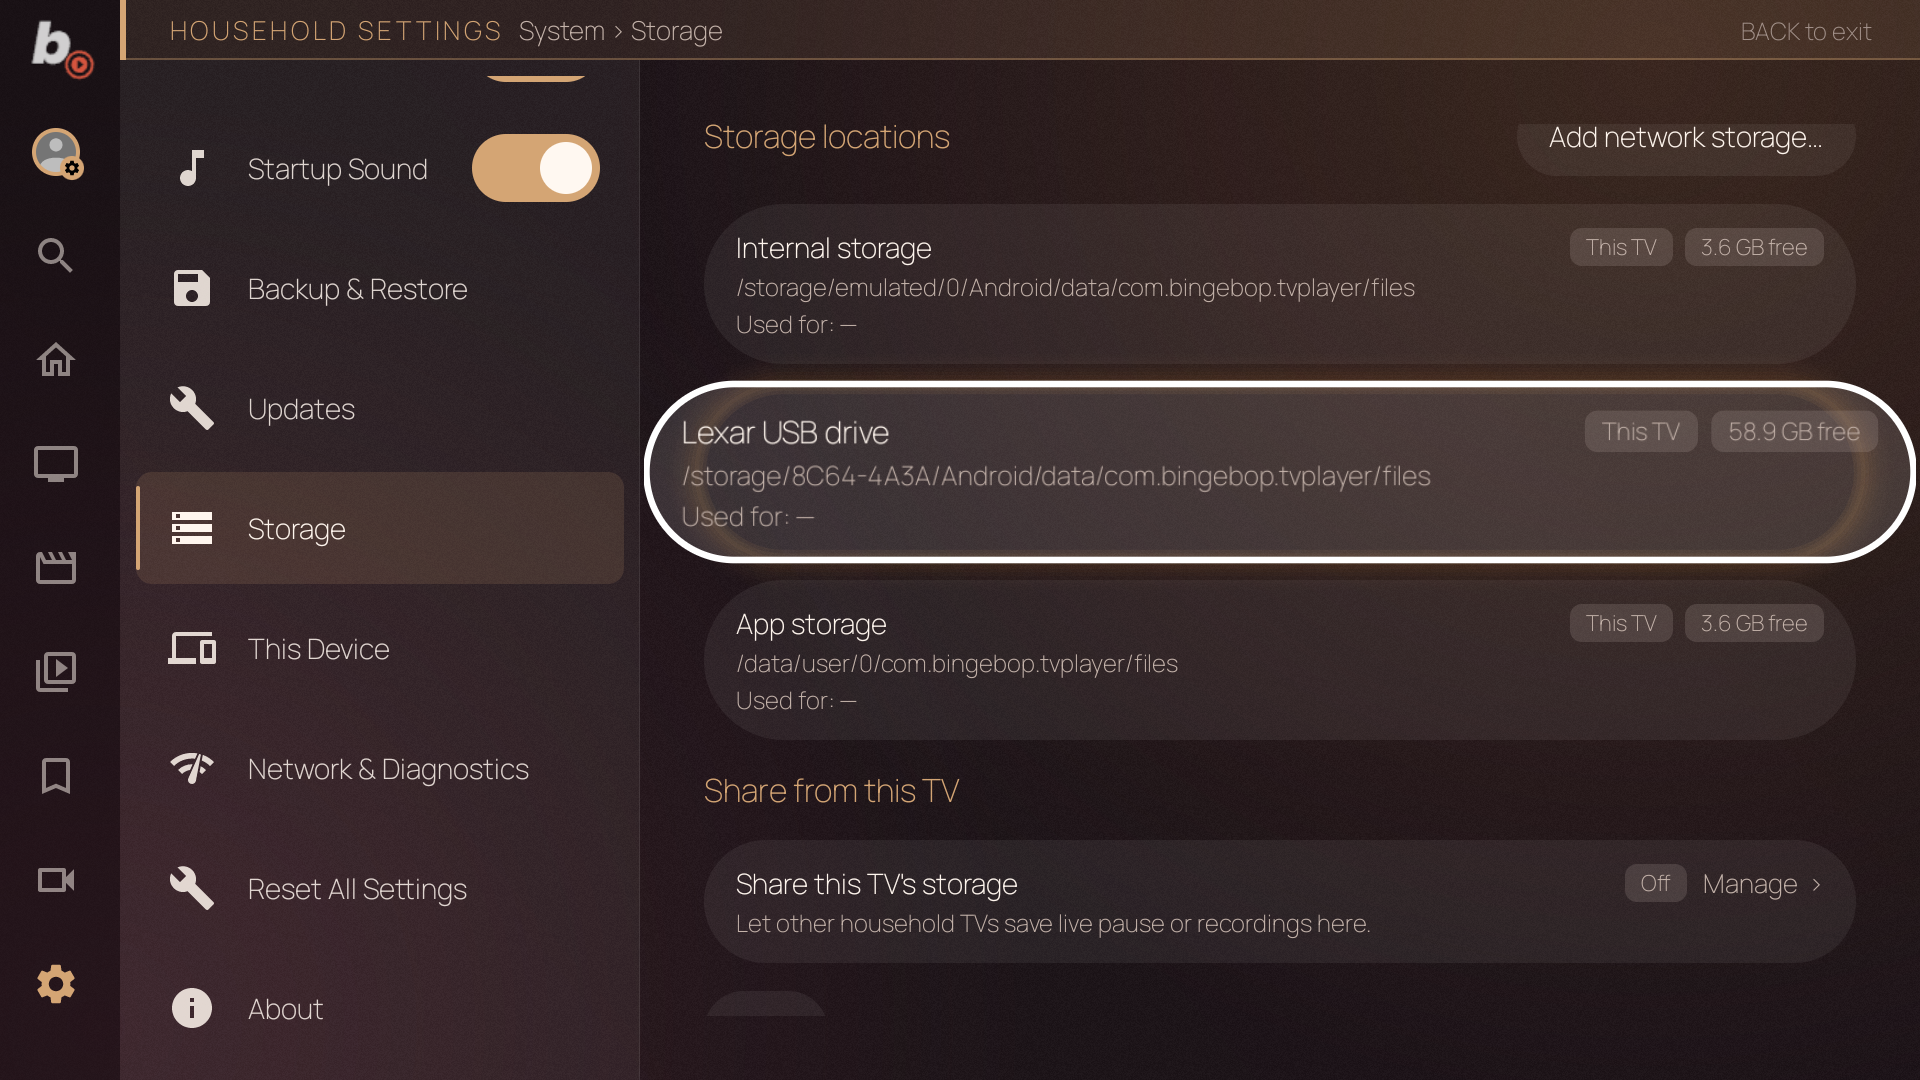
Figure 10.2 — Storage locations showing internal storage, a USB drive, and app storage with free-space indicators.
These locations appear automatically:
- Internal storage
- The storage inside the device. Most Android TV devices have a few free gigabytes only.
- USB drive
- A USB drive appears when you connect it. BingeBop uses the label of the drive as its name, for example "Lexar USB drive". A USB drive is usually the best destination, because it has more space and writes faster than internal storage.
- App storage
- Built-in fallback storage. Usually limited, so BingeBop uses it only when no other destination is available.
10.3 Adding Network Storage
Select "Add network storage..." to connect a network share. You can then save recordings and live-pause data on a NAS, in a shared folder on a PC, or on any network-accessible device. BingeBop supports three protocols:
- Samba (SMB)
- The most common network sharing protocol. Works with Windows shared folders, most NAS devices, and Linux Samba servers.
- WebDAV
- An HTTP-based protocol supported by many cloud and self-hosted storage services.
- SFTP
- Secure file transfer over SSH. Supports password authentication and private key authentication (with optional passphrase).
The fields depend on the protocol you choose, but typically include:
- Server address — the IP address or the host name, for example
192.168.1.50. - Port — the server port (defaults to the standard port for each protocol).
- Share name / Path — the shared folder and a path inside it, for example
bingebop/recordings. - Username and password — the credentials, if required. SFTP also accepts a private key.
If the location cannot be saved, correct the server address or credentials shown in the error.
10.4 USB Drive Defaults
When you connect a USB drive the first time, BingeBop reacts automatically:
- Live pause changes to the USB drive, if the setting is "Automatic".
- Recordings — BingeBop asks you once where to save recordings. It keeps your answer.
If you remove the USB drive while BingeBop runs, the live-pause buffer breaks for a moment. BingeBop then writes to internal storage, or it stops. The fallback setting controls this.
10.5 Sharing Storage with Other Devices
The setting "Share from this TV" is at the bottom of the Storage panel.
Turn it on to offer the local storage of this device — internal or USB — to the other BingeBop devices in your cluster. The other TVs can then write their live pause data and their recordings to this drive over the network.
This helps when one device has a large USB drive and the others have none. The other devices use it as a shared DVR destination. For more about the cluster, see Chapter 12: Cluster & Multi-Device.
Profiles & Multi-User
BingeBop supports several profiles. Each person in the household gets their own favourites, watch history, watchlist, and settings.
11.1 How Profiles Work
Each profile in BingeBop keeps its own:
- Favourites — favourite channels and groups.
- Watch history — recent channels, playback positions, and watched status.
- Watchlist — saved movies and series.
- Settings — audio and subtitle language, theme, skip step, autoplay, and other personal preferences.
- Parental controls — age limit and screen time limits. The household admin sets these.
The household shares the channel numbers and the sources. Channel groups exist on both levels — groups created in Household Settings mode are visible to every profile, and each profile can also create its own groups (see Chapter 4).
11.2 Switching Profiles
To change profile without restarting BingeBop, select the User icon at the top of the sidebar, then select another profile.
11.3 Managing Profiles
You manage the profiles at Settings → User → Profiles. When the household has a PIN, this needs Household Settings mode. The Profiles panel lists all profiles and has an "+ Add Profile" button.
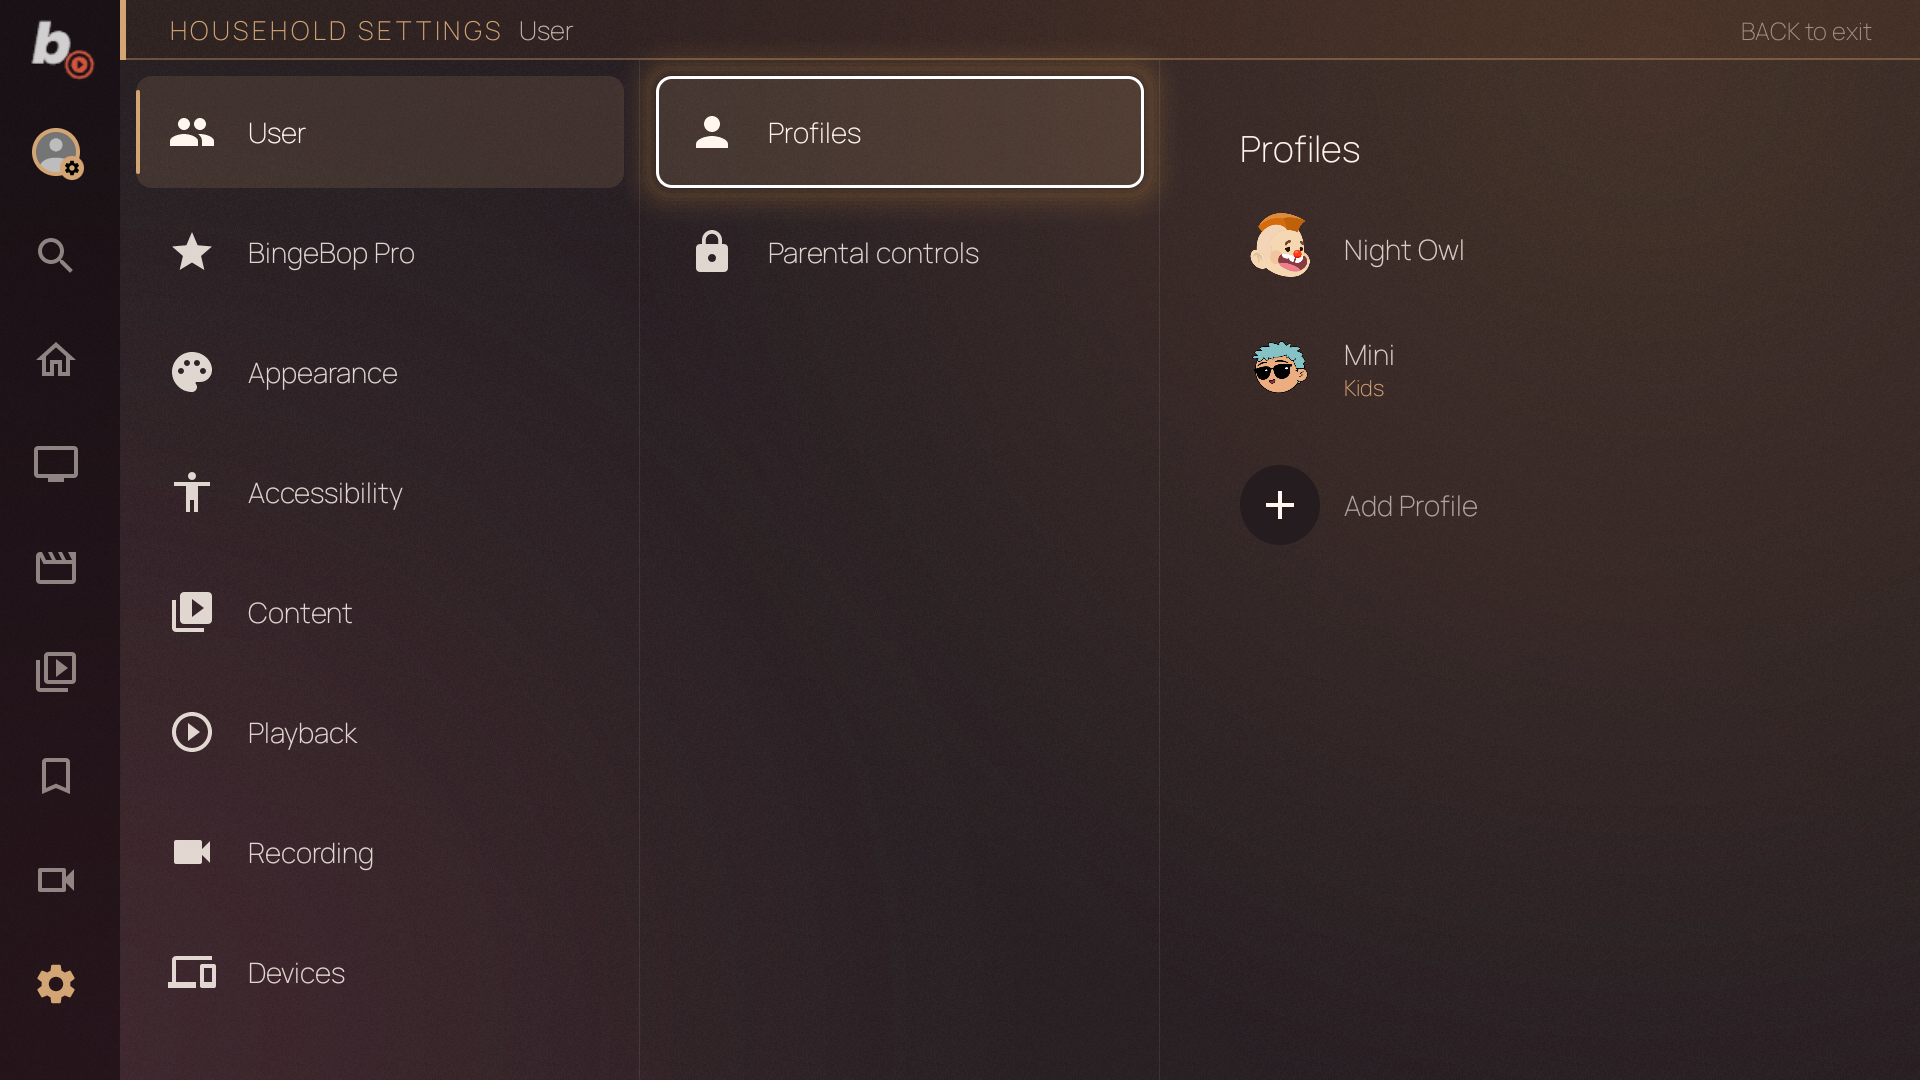
Figure 11.1 — The Profiles panel in Household Settings.
Creating a profile
- Select "+ Add Profile".
- Choose Adult or Child. A child profile needs at least one adult profile in the household.
- If you chose Child, enter a date of birth. BingeBop uses the age to calculate the content limit for this profile. See Chapter 13: Parental Controls.
- Enter a name for the profile.
- Select an avatar.
- Set an optional four-digit profile PIN, or select Skip.
- Confirm the new profile.
Editing a profile
In Household Settings mode, select a profile to change its name, avatar, or date of birth, or to remove its PIN. An adult can also edit their own profile without entering Household Settings: open the User panel from the sidebar, hold OK on your profile, then select Edit. Child profiles cannot edit themselves.
Removing a profile
When the household has a PIN, removing a profile requires Household Settings mode. Select a profile that is not currently active and select Remove. BingeBop removes the profile and all its personal data permanently. This includes the favourites, the watch history, the watchlist, and the settings.
11.4 Household Settings Mode
Some settings apply to the whole household: sources, channel numbers, storage, profiles, parental controls, and device configuration. When the household has a PIN, you change these in Household Settings mode, which asks for the PIN.
In Household Settings mode, an amber "HOUSEHOLD SETTINGS" bar appears at the top of the screen, with "BACK to exit" on the right. Every change in this mode applies to the household, not to your profile alone.
A setting that needs this mode shows a lock icon in the normal settings menu. When you select it, BingeBop asks you to enter Household Settings mode first. The locks apply only when the household has a PIN. Without a PIN, any adult profile can change every setting directly, without entering Household Settings mode first. Child profiles always see the locks.
Household Settings mode is still needed for library changes that apply to every profile: hiding, renaming, favouriting, or locking channels and groups for the whole household. Outside this mode, those changes apply to your own profile only.
Household PIN
Enter Household Settings mode, then open Settings → Household Settings to set, change, or remove the household PIN. You need the PIN to enter Household Settings and to temporarily unlock a locked channel. When no PIN is set, anyone can enter Household Settings.
You can change the PIN without entering the current one while you are already in Household Settings mode. Removing the PIN always requires the current PIN. If you forgot it, select "Forgot PIN?" and follow the recovery instructions.
11.5 Web Remote
BingeBop has a built-in web remote. It lets you control the TV from the browser of a phone or a laptop. Use it to enter text, to move through the menus, and to control playback from your chair.
To connect:
- On the TV, open Settings → System → Network & Diagnostics → LAN API Access.
- Scan the QR code with your phone. If you need to enter the address manually, use the address shown on the TV.
For more about the web remote and the HTTP API, see Chapter 19: API & Integration.
Cluster & Multi-Device
You can pair the BingeBop devices on your home network into a cluster. A cluster is a household group. Sources, channels, movies, series, favourites, recordings, settings, and profiles sync automatically to all your TVs.
12.1 What Is a Cluster?
A cluster is a group of BingeBop devices in one household. The devices in a cluster share a library and keep each other up to date. You set up your channels one time on one device, and they appear on all the others.
This table shows what syncs between the devices in a cluster:
| Syncs across the cluster | Stays per-device |
|---|---|
|
Channel list and groups Channel numbering and pins Favourites and hidden items EPG data and EPG bindings User profiles and their settings Watch history and resume positions Watchlist Recordings catalog Source configuration Name cleanup rules Parental controls |
Storage destinations Display and video settings Device name and leader priority Startup destination Sleep timer Audio output mode Keyboard mode |
The rule is simple. Your preferences and your content sync. Hardware settings stay on each device.
Only one device in the cluster downloads the channel and movie lists from your providers. The other devices copy the lists from it, so your provider sees one connection instead of one per TV, and every TV shows the same channel numbers. When you add or refresh a source on another TV, BingeBop shows Importing on <device name>… and the new channels appear on every TV when that device finishes. If that device is off for a long time, another device that already has your library takes over.
12.2 Adding Another TV
Complete the setup of your first TV before adding another one. Then:
- Connect both TVs to the same local network and start BingeBop on both.
- On the new TV, choose "Already have BingeBop on another TV? Connect to it" in the setup wizard.
- Select your household.
- On the first TV, open Settings → Devices and approve the pending request.
12.3 The Devices Panel
Use the Devices panel to join an available cluster, approve pairing requests, rename devices, or leave your current cluster. Leaving disconnects a device and makes it independent again.
12.4 Stream Sharing
Two TVs watching the same channel can share one provider connection, which helps households with a low connection limit. The household then shares the connection instead of using one connection per device.
12.5 Recording Coordination
The cluster can assign a recording to a suitable available device. If that device becomes unavailable, another cluster device may continue the recording.
Every device in the cluster shows the finished recordings. Recordings made elsewhere in the cluster remain available while the recording device or shared storage is online.
For storage between devices, see Chapter 10: Storage. The "Share this TV's storage" function lets the USB drive of one device serve as a shared DVR destination.
12.6 Device Name & Leader Priority
Each device in the cluster has a name. The other devices and the messages use this name. Leave Leader priority at its default in most households. Set a higher priority on an always-on device if you want that device to coordinate the household.
Parental Controls
Control what each member of the family can watch, and for how long. The parental controls work per profile, so each child can have different limits.
13.1 Adult Content Block
BingeBop always blocks adult content for a profile with an age below 18. It calculates the age from the date of birth. This block is not a setting, and you cannot turn it off.
BingeBop identifies adult content using information supplied by your sources and the content names.
Blocked content disappears completely. It does not appear in the channel guide, in the search results, on the Home dashboard, or in any other list. A PIN does not open it, because the content is invisible.
13.2 Age-Based Content Gate
The adult block is absolute. In addition, you can turn on an age limit. It filters content by its age rating, where the provider or TMDB gives one.
- Age restriction (on/off)
- The main switch. When it is on, BingeBop hides content with a rating above the age limit of the profile. The default is on.
- Maturity offset
- Sets the age limit relative to the real age of the profile:
- Strict (+0) — the limit is the exact age of the child.
- Default (+2) — the limit is 2 years above the age of the child. A child of 10 can see content rated 12.
- Teens (+4) — the limit is 4 years above the age. A child of 10 can see content rated 14.
- Hide unrated content
- When it is on, BingeBop hides content that has no rating. The default is off, so unrated content is visible. Turn it on if a profile must see rated content only.
13.3 Screen Time Limits
Limit the daily watch time of a child, and the hours of the day. The cluster counts the time on all TVs of the household. The living room TV and the bedroom TV use the same daily budget.
- Screen time limits (on/off)
- The main switch. The default is off.
- Weekday daily cap
- The maximum watch time from Monday to Friday. The options are no limit, 30 minutes, 1 hour, 1.5 hours, 2 hours, and 3 hours.
- Weekend daily cap
- A separate limit for Saturday and Sunday. It is usually higher than the weekday limit.
- Weekday allowed hours
- The hours when the child can watch on a weekday, for example 16:00 to 20:00. Outside these hours, BingeBop blocks playback and shows a "Come back at..." message.
- Weekend allowed hours
- The same hours for the weekend.
- Daily reset hour
- The time when the daily budget starts again: midnight, 3 AM, or 6 AM. Use 3 AM or 6 AM if your household watches TV after midnight.
How enforcement works
BingeBop shows a warning before the limit. At the limit, a "Time's up" overlay covers the video. To give extra time, the admin enters the household PIN in that overlay.
13.4 Channel & Content Locking
The age limit works automatically. To manage additional locks, first enter Household Settings mode. You can lock individual live TV channels or lock channel groups, movie categories, and series categories for specific profiles.
- Open Settings → Household Settings and enter Household Settings mode.
- For a live TV channel, hold OK on the channel in the guide. For a group or VOD category, hold OK on it in the Groups panel.
- Select Lock or Stealth lock.
A lock keeps the channel or category visible but prevents its content from playing. To watch it, go to Settings → Access & Privacy → Temporarily unlock hidden channels and enter the household PIN. The unlock lasts until you re-lock, switch profiles, or three hours pass.
A stealth lock hides the channel or category and its content from the guide, search results, and Home dashboard. The admin can still manage it in Household Settings mode.
Admin edit mode
To lock or unlock many channels at once, first switch to the profile you want to configure (the lock state is per-profile), then open Admin Edit Mode. Lock controls appear on every channel in the guide, and you can set the access for that profile quickly.
13.5 Profile PINs
Each profile can have an optional four-digit PIN. BingeBop asks for the PIN before switching to that profile, including when the profile is selected automatically at startup.
You can set the PIN when you create a profile. An adult can later manage their own PIN from the sidebar: open the User panel, hold OK on your profile, then select Set PIN, Change PIN, or Remove PIN. Changing or removing it requires the current profile PIN.
Child profiles cannot manage their own PIN. If a profile PIN is forgotten, enter Household Settings mode, open Settings → User → Profiles, select the profile, and remove its PIN. Profile PINs do not have a Forgot PIN? recovery option.
Appearance & Accessibility
Change the appearance of BingeBop with themes, colours, fonts, and layout density. This chapter also covers the accessibility settings for comfortable viewing.
14.1 Themes
BingeBop includes several themes. A theme changes the colours of the whole interface. A live preview on the right shows each theme before you apply it.
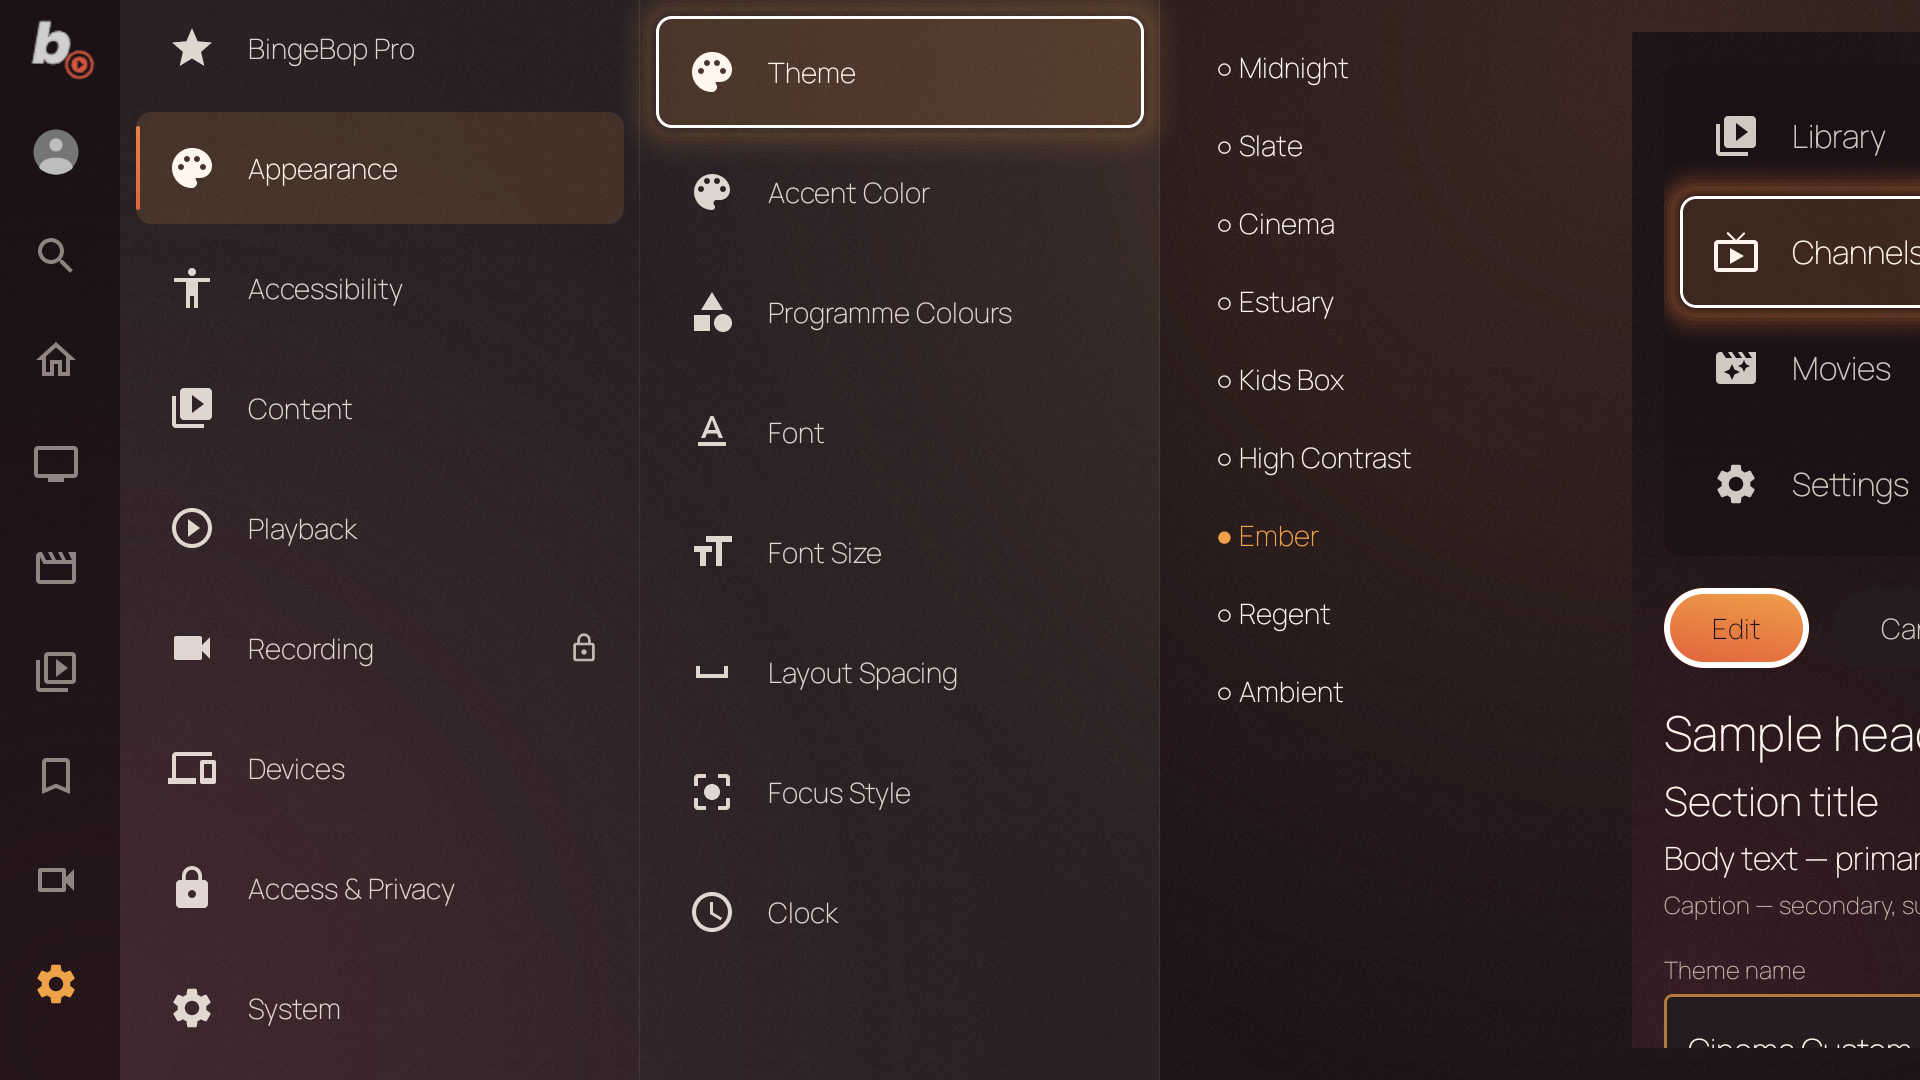
Figure 14.1 — The theme picker with a live preview showing sample UI elements.
These themes are available:
- Ember — the default theme, with warm charcoal and amber accents.
- Midnight — a dark theme with cool blue accents.
- Slate — a colder dark theme.
- Cinema — a warmer, darker look.
- Estuary — colours from Kodi.
- Kids Box — bright colours for the profile of a child.
- High Contrast — the best readability for users with low vision.
- Regent — a quiet, elegant palette.
- Ambient — a soft, calm look.
The theme belongs to the profile. Each person selects their own.
14.2 Accent Colour
The accent colour marks the selected item, the active switches, the buttons, and the progress bars. Select a colour in the grid. The change is immediate, so you see the result while you browse.
14.3 Programme Colours
This panel controls the genre colour stripes on the cells in the Channel Guide. See Chapter 3, Section 3.7. A main switch turns the stripes on or off. You can also set the colour of each genre: Movies, Series, News, Sports, Documentary, Kids, Music, Talk & Shows, and Reality.
14.4 Font, Size & Layout
- Font
- Sets the typeface of the interface:
- Legibility (Atkinson Hyperlegible) — the default. It is made for reading at a distance and for low vision.
- Cinematic (Manrope) — a modern, geometric look.
- Soft (Nunito) — round and friendly.
- Font Size
- Sets the size of all text: Normal, Large, XLarge, or XXLarge. Use a larger size for a small TV, or if you sit far from the screen.
- Layout Spacing
- Sets the density of the interface. Compact shows more content. Comfortable is the default. Spacious gives more space between the elements.
- Focus Style
- Sets how BingeBop marks the selected item: Subtle, Standard, Bold, or Underline. Standard is the default. Select the style you see best.
14.5 Clock Overlay
A clock appears in the top-right corner of the screen with the player overlay. These settings control it:
- Show / hide
- Turns the clock on or off.
- Size
- Small, Normal, Large, or XLarge.
- Opacity
- Sets how solid the clock looks: 100%, 85%, 70%, or 50%.
- Show date
- Adds the day of the week and the date below the time.
- Wi-Fi quality icon
- Adds a Wi-Fi signal icon next to the clock. Its colour shows the signal quality. The icon appears only on Wi-Fi — on Ethernet it is not shown.
14.6 Subtitle Appearance
Subtitle appearance settings affect restylable text subtitles. Some broadcaster-supplied image subtitles retain their original appearance and cannot be restyled.
Change how text subtitles look on the screen:
- Size
- Makes the subtitle text larger or smaller.
- Text colour
- White is the default. Yellow, green, cyan, and other colours are also available.
- Background
- Puts a dark box behind the text and improves the readability. You can set its opacity. Without a background, the text floats over the video.
- Outline / edge style
- None, outline, drop shadow, or raised. An edge keeps the text readable over a bright picture.
- Position
- Sets the position of the subtitles on the screen, at the bottom or higher up.
- Opacity
- Sets how solid the subtitles look.
14.7 Accessibility
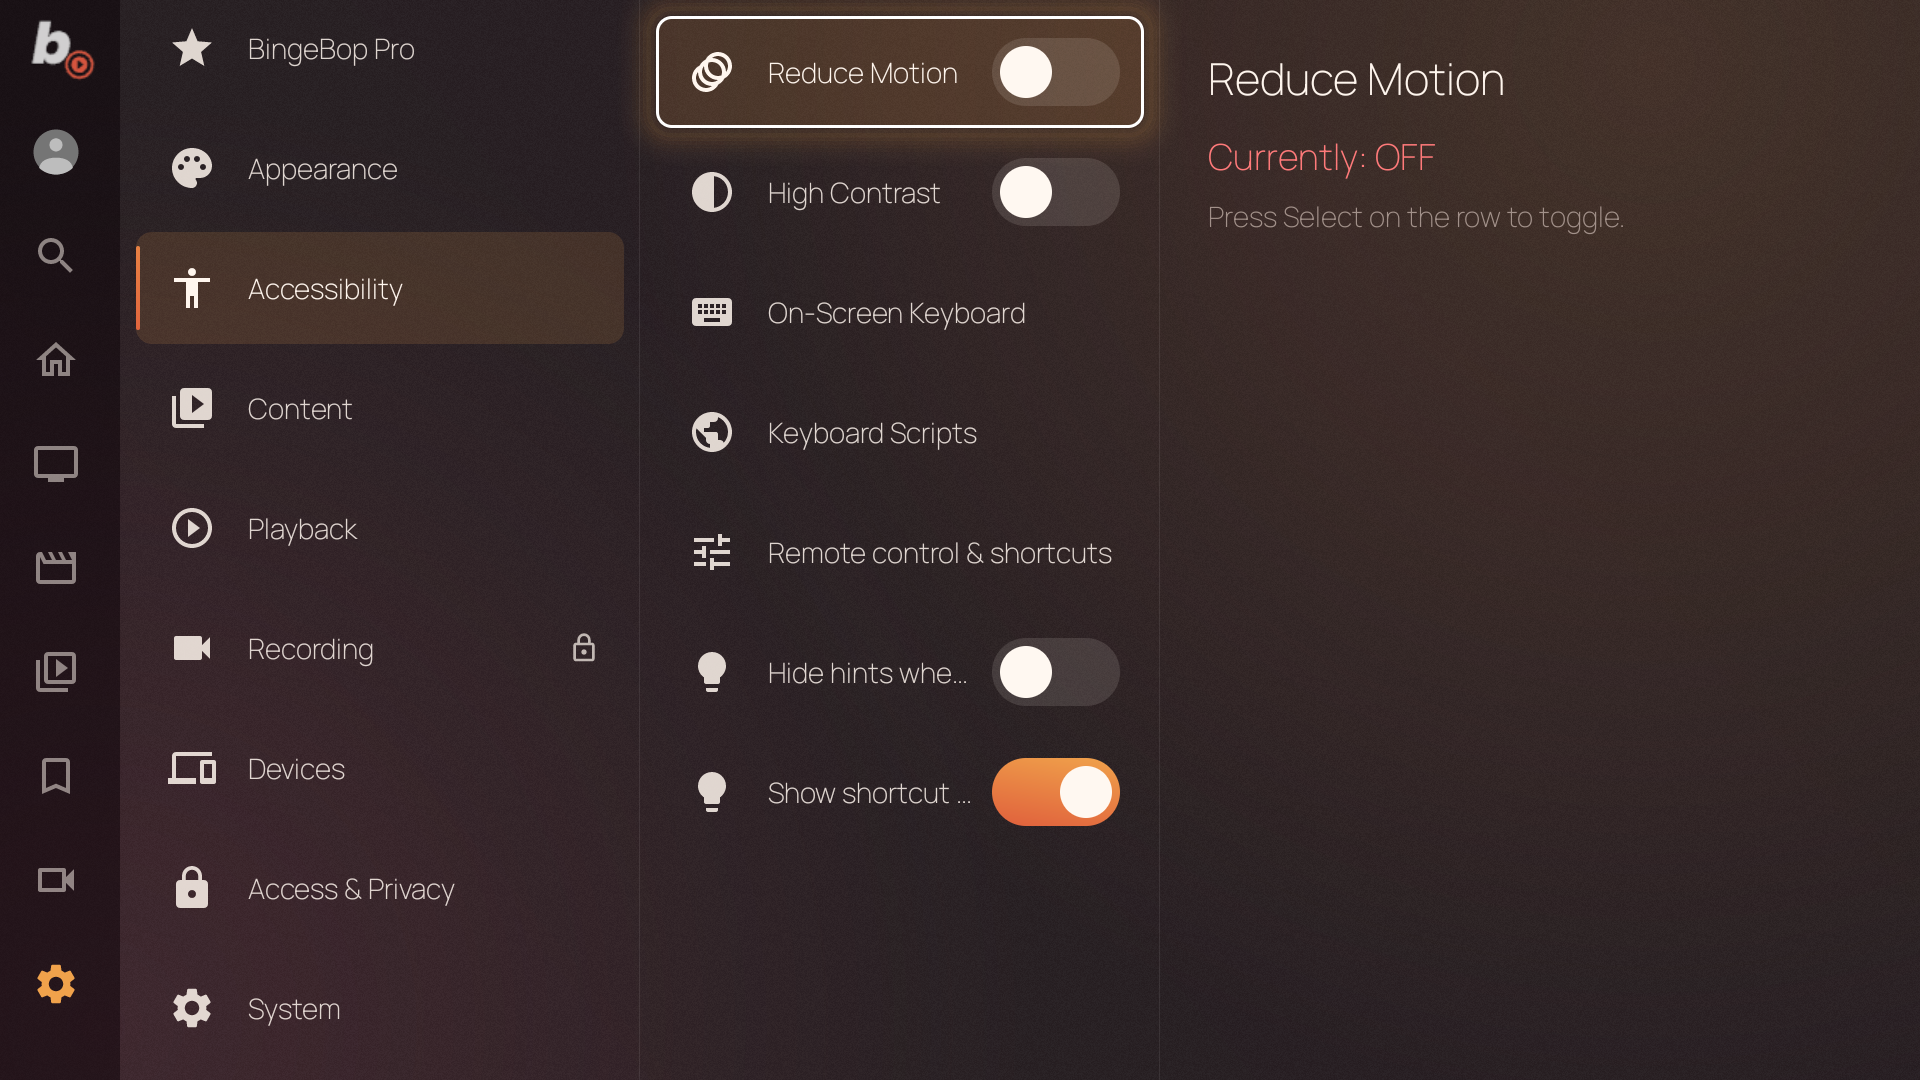
Figure 14.2 — The Accessibility settings panel.
- Reduce Motion
- Reduces or removes the animations in the interface. This includes the focus movements, the panel slides, and the card scaling. It helps viewers who are sensitive to motion.
- High Contrast
- Changes to a high-contrast colour scheme for the best readability. The genre colour stripes in the guide disappear, because they lower the contrast.
- On-Screen Keyboard
- Selects the keyboard: the BingeBop keyboard for a D-pad, or the system keyboard of Android.
- Keyboard Scripts
- Adds character sets to the on-screen keyboard, such as Cyrillic, Greek, and Arabic. See Chapter 9, Section 9.2.
- Remote Control & Shortcuts
- Sets the action of a short press and of a hold on each button of your remote. It also sets the skip step. See below.
- Hide Hints When Learned
- When it is on, the key hints on the screen, such as "HOLD OK Options", disappear after you use them several times.
- Show Shortcut Bar
- Shows or hides the bar at the bottom of the screen with the available key actions.
14.8 Button Mapping
Change the function of the buttons on your remote. BingeBop supports several trigger types:
- Press — a single short press.
- Hold — press and hold a button.
- Double press — press a button twice quickly.
- Sequence — press two buttons in order (for example, Up then Down).
- Swipe — swipe gestures on a touchpad remote (left, right, up, down).
Each binding belongs to a context. A context is a screen or mode where the binding applies. The main contexts are:
- Global — works everywhere in the app.
- Player (Live) — during live TV playback.
- Player (VOD / Recording / Catch-up) — during seekable playback, with specific overrides for each type.
- Player with PiP — when PiP is active, additional bindings become available (close, swap, move corner, switch audio).
- Guide — inside the channel guide.
- Lists — in browsing screens (movies, series, home).
Contexts inherit from each other. A binding set on the Player context applies to all player modes (live, VOD, recording) unless a more specific context overrides it.
You can also set the skip step. It controls how many seconds the skip buttons move. The default is 10 seconds, and the range is 5 to 30 seconds.
14.9 Navigation Sounds
BingeBop plays quiet sounds while you navigate menus and settings. You hear a click on a button press, a soft tone when the selection moves, and another tone at the end of a list. Navigation sounds are automatically suppressed during playback so they never play over the content. The app can also play a sound at startup.
Both sounds have their own setting in Settings → System:
- Navigation Sounds — turns all interface sounds on or off.
- Startup Sound — turns the startup sound on or off.
Settings Reference
A reference list of every setting in BingeBop. The order follows the categories of the Settings menu. A setting with a lock icon needs Household Settings mode and the household PIN. Locks appear only when the household has a PIN.
15.1 Appearance
| Setting | Options | Default | Scope |
|---|---|---|---|
| Theme | Ember, Midnight, Slate, Cinema, Estuary, Kids Box, High Contrast, Regent, Ambient | Ember | per-user |
| Accent Color | Colour swatch picker | Theme default | per-user |
| Programme Colours | On / Off + per-genre colour | On | per-user |
| Font | Legibility (Atkinson) / Cinematic (Manrope) / Soft (Nunito) | Legibility | per-user |
| Font Size | Normal / Large / XLarge / XXLarge | Normal | per-user |
| Layout Spacing | Compact / Comfortable / Spacious | Comfortable | per-user |
| Focus Style | Subtle / Standard / Bold / Underline | Standard | per-user |
| Clock: show | On / Off | On | per-device |
| Clock: size | Small / Normal / Large / XLarge | Normal | per-device |
| Clock: opacity | 100% / 85% / 70% / 50% | 100% | per-device |
| Clock: show date | On / Off | Off | per-device |
| Clock: Wi-Fi icon | On / Off | Off | per-device |
15.2 Accessibility
| Setting | Options | Default | Scope |
|---|---|---|---|
| Reduce Motion | On / Off | Off | per-user |
| High Contrast | On / Off | Off | per-user |
| On-Screen Keyboard | Custom (BingeBop) / System | Custom | per-device |
| Keyboard Scripts | Multi-select: Latin, Cyrillic, Greek, Arabic, ... | Device locale + Latin | per-user |
| Remote control & shortcuts | Per-button action mapping | Built-in defaults | per-device |
| Hide hints when learned | On / Off | Off | per-user |
| Show shortcut bar | On / Off | On | per-user |
15.3 Content
| Setting | Options | Default | Scope |
|---|---|---|---|
| Playlist refresh interval | Off / 12h / 24h / 48h / Weekly / Fortnightly / Monthly | Weekly | household |
| Rebuild Search Index | Normally not needed: search updates automatically. Use only if results appear stale or incomplete after an import or a channel-membership change, or when an upgrade specifically asks you to. Recreates search results from the current library; does not delete channels, sources, settings, or recordings. | On demand | household admin |
| Auto-remove watched from Watchlist | On / Off | On | per-user |
| Channel name country prefix | Remove / Short / Bracket / Flag / Keep | Remove | household |
| Group name country prefix | Remove / Short / Bracket / Flag / Keep | Keep | household |
| Strip decorative symbols | On / Off | Off | household |
| Channel list order | By channel number / Alphabetical | By channel number | per-device |
| Group order | Provider order — interleaved / Provider order — one after another / A–Z | Provider order — interleaved | per-user, synced |
| Guide banner size | Large / Small / Off | Large | per-device |
| Show channel numbers in EPG | On / Off | On | per-device |
| Show channel icons in EPG | On / Off | On | per-device |
| Channel icon priority | Provider First / EPG First | Provider First | per-user |
Main menu items
Choose which sections appear in the main menu. Each row — TV, Movies, Series, Watchlist, Recordings, Add-ons — has an On/Off switch; a switch can also turn the User row off when the device has a single profile. Search and Settings are always visible and cannot be removed. A quick way to hide a section: on the Home screen, highlight its row in the menu rail, press « (Left) to open the Hide option, then press OK. To bring a section back, set its switch to On in this panel. Reset returns every row to its On position. These choices belong to your profile and do not change anything in the library.
15.4 Playback
Startup
| Setting | Options | Default | Scope |
|---|---|---|---|
| Startup destination | Last Channel / Home / Guide / Specific Channel | Last Channel | per-device |
| Startup channel | Channel picker | None | per-device |
| Resume last channel from | This TV (local) / This User Across Cluster (synced) | This TV | per-device |
| Auto-start on boot | On / Off | Off | per-device |
Live TV
| Setting | Options | Default | Scope |
|---|---|---|---|
| Live pause / timeshift | On / Off | On | per-device |
| Timeshift storage limit | Destination-dependent size limits / No limit | No limit (about 3 hours of rewind depth) | per-device |
| Adaptive pacing | On / Off — helps smooth playback on uneven streams. Leave on unless support recommends otherwise. | On | per-device |
| Recent channels delay | 0 / 10 / 30 / 60 / 120 seconds | 30s | per-user |
| Recent channels limit | 5 / 8 / 12 / 20 | 12 | per-user |
| Exclude adult from recents | On / Off | On | per-user |
| Zap browse strip | On / Off | On | per-device |
| Signal indicator mode | Threshold / Always / Off | Threshold | per-device |
| Signal indicator threshold | 35 / 50 / 60 / 70 / 80 / 90% | 70% | per-device |
Audio & Subtitles
| Setting | Options | Default | Scope |
|---|---|---|---|
| Audio output | Auto / Passthrough / PCM 7.1 / PCM 5.1 / Stereo | Auto | per-device |
| Audio and movie language | Off / Automatic / specific language | Off | per-user |
| Automatically enable subtitles | On / Off | Off | per-user |
| Default subtitle language | Automatic / specific language | Automatic | per-user |
| Subtitle appearance | Size, colour, background, outline, position, opacity | Theme defaults | per-user |
Video
| Setting | Options | Default | Scope |
|---|---|---|---|
| Preferred quality | Auto / SD / HD / FHD / 4K | Device-dependent | per-device |
| Video scaling | Scaling method + shader algorithm | Device-dependent | per-device |
| A/V sync device offset | Milliseconds (slider) | 0 | per-device |
| VOD cache budget | 256 / 512 / 1024 / 2048 / 4096 / 8192 MB | 2048 MB | per-device |
Playback Controls
| Setting | Options | Default | Scope |
|---|---|---|---|
| Inactivity sleep timer | Off / 2h / 3h / 4h / 6h | 4h | per-device |
| Skip step | 5 / 10 / 15 / 30 seconds | 10s | per-user |
| Seek preview video | On / Off | On | per-user |
| Transport feedback icon | On / Off | On | per-user |
| Autoplay next episode | On / Off | On | per-user |
| Autoplay countdown | Immediately / 5s / 10s / 15s | 10s | per-user |
| Skip intro & credits | On / Off | On | per-user |
Advanced / Compatibility
Leave these settings at their defaults unless BingeBop support asks you to change one.
| Setting | Options | Default | Scope |
|---|---|---|---|
| Direct render | On / Off | On | per-device |
| Tunneled playback | On / Off (only on capable devices) | Off | per-device |
| Independent PiP focus | On / Off | On | per-device |
| Force software decode | On / Off | Off | per-device |
15.5 Recording
| Setting | Options | Default | Scope |
|---|---|---|---|
| DVR destination | Storage location picker | Ask on first use | per-device |
| Pre-padding | 0 / 30s / 60s / 120s / 300s | 30s | per-device |
| Post-padding | 0 / 30s / 60s / 120s / 300s | 120s | per-device |
15.6 Access & Privacy
| Setting | Options | Default | Scope |
|---|---|---|---|
| Lock device settings to admin | On / Off | Off | per-device |
| Temporarily unlock hidden channels | PIN entry / Re-lock | Locked | per-device session |
| Anonymous telemetry | On / Off | On | per-device |
15.7 System
| Setting | Options | Default | Scope |
|---|---|---|---|
| Navigation sounds | On / Off | On | per-device |
| Startup sound | On / Off | On | per-device |
| Update channel | Stable / Beta | Stable | per-device |
| Auto-check for updates | On / Off | On | per-device |
| Device name | Free text | (Device model) | per-device |
| Leader priority | Low / Normal / High / Highest | Normal | per-device |
Network & Troubleshooting
Tools that find connection problems, get around blocks by your internet provider, and show you what happened in the app.
16.1 Connection Troubleshooter
Use the connection troubleshooter when a channel fails, or when you think the network causes interruptions and picture errors.
The troubleshooter checks your device, home network, internet connection, source, and stream. Follow the recommended action for any stage that fails.
Wi-Fi is the most common cause of picture errors with IPTV.
16.2 Encrypted DNS
Some internet providers block the domains of IPTV providers with the DNS. Their DNS server then answers with a false "not found". Encrypted DNS avoids this block. It sends the name request through an encrypted channel that the internet provider cannot change.
- Off (default)
- Uses the normal DNS of the system. This is correct for most users and adds no delay.
- DoH (DNS-over-HTTPS)
- Recommended encrypted option; usually the most compatible. The available services are Cloudflare, Google, Quad9, and your own URL.
- DoT (DNS-over-TLS)
- Encrypted, but some networks block it.
- Plain custom DNS
- Not encrypted; use only if the encrypted options do not work.
16.3 Event Log
The event log keeps the important events of the last 24 hours. It records technical issues.
Use the log when you report a problem. It usually shows the cause and the moment of the failure.
16.4 HDHomeRun Signal Status
Use the signal indicator to check reception on an HDHomeRun antenna channel. Low quality usually points to an antenna problem; low strength indicates a weak signal.
Set when the indicator appears in Settings → Playback → Live TV:
- Threshold (default)
- Shows the indicator when the quality falls below a value you set. The default value is 70%. With a strong signal, the indicator stays hidden.
- Always
- Shows the indicator on every HDHomeRun channel.
- Off
- Never shows the indicator.
16.5 LAN API Access
Scan the QR code for web-remote access. Keep the full API token private and regenerate it if it has been exposed.
The Regenerate token button creates a new token. This invalidates the old one. Any phone remote or integration tool using the old token must re-scan the QR code or enter the new code. For details, see Chapter 19: API & Integration.
16.6 Per-Source User-Agent
Some IPTV providers read the User-Agent header and block apps they do not know. If your provider rejects BingeBop, set a different User-Agent for that source. BingeBop then identifies itself as another player.
Open Settings → Content → Sources, select the source, and fill in the User-Agent field. Presets exist for common players: VLC, Kodi, TiviMate, Smarters, and MAG250. You can also enter your own text.
BingeBop Pro
17.1 The Pro Screen
Open the Pro screen to activate or manage your subscription. Reach it from the sidebar menu with the star icon, or from the Settings.
17.2 Activating Pro
To activate a Pro subscription:
- Open the BingeBop Pro screen from the sidebar or from the Settings.
- Select Activate or Subscribe.
- Follow the instructions on the screen to complete the purchase.
One Pro activation covers all devices in your household cluster.
System & Maintenance
Save your settings, keep BingeBop up to date, and find the version and device information.
18.1 Backup & Restore
Export all your BingeBop data to an encrypted file. The file holds the channels, the settings, the favourites, the profiles, the list of recordings, the EPG bindings, the custom groups, and the parental controls. Import the file on the same device or on another device to restore everything.
Backups are always encrypted. If a household PIN is set, you need the same PIN to restore the backup. The backup contains your provider credentials. If you store the file on a cloud service or share it with someone, encrypt it separately with a strong password first.
Creating a backup
- Open Backup & Restore in the Settings.
- Select Export.
- If a household PIN is set, enter it. You will need the same PIN to restore the backup.
- Select a destination: internal storage or a network share.
- Wait for the export to finish before leaving the screen.
Restoring a backup
- Open Backup & Restore in the Settings.
- Select Restore, then find the backup file.
- If the backup was made with a household PIN, enter that PIN.
- Wait for the restore to complete. BingeBop restarts afterward.
18.2 Updates
BingeBop looks for updates automatically. You control this in the Settings. When an update is available, a message appears with the release notes and an install button.
- Update channel
- Select Stable for tested releases. This is the recommended channel. Select Beta for the newest features, which can still have faults.
- Auto-check for updates
- On by default. BingeBop then looks for updates at intervals and at each start.
- Check now
- Starts a check immediately from the Updates panel.
Follow the Android installation prompts. Install updates only when they are offered by BingeBop.
18.3 About
When contacting support, provide the Version and Device ID shown in Settings → System → About. They help the support team to find your configuration.
18.4 Reset All Settings
This action wipes all data on this device and restarts the app. Channels, settings, profiles, watch history, favourites, and custom groups are all deleted. Create a backup first if you want to keep your data (see Section 18.1).
When the household has a PIN, the action needs Household Settings mode.
Single device (no cluster)
The app returns to its first-run state, as if it was just installed. The setup wizard appears on restart.
In a cluster (multiple devices)
When this device is part of a cluster, you are given a choice:
- Reset & stay in household — wipes all local data but keeps this device in the cluster. On restart, you can choose Restore from household to re-sync your channels, sources, and settings from another device in the cluster, or Start fresh to leave the cluster and set up from scratch.
- Reset & leave household — wipes all local data and removes this device from the cluster. The other devices are notified. The setup wizard appears on restart as if the app was just installed. To rejoin, pair the device again from the Devices panel on another TV (see Chapter 12).
API & Integration
BingeBop can be controlled from your phone, your laptop, or a home-automation tool on the same local network.
19.1 Connecting to the API
BingeBop has an API for home-automation tools. The QR code shown with the on-screen keyboard grants remote-control access. The full API token in Settings → System → LAN API Access must be kept private.
19.2 Common Integration Use Cases
BingeBop can be controlled by Home Assistant, Tasker, and other tools that support HTTP requests. It can also provide its channel lineup to compatible players such as VLC or Plex. For setup instructions, visit the BingeBop subreddit at r/BingeBop.
19.3 Web Remote
BingeBop has a built-in web remote. Scan the QR code next to the on-screen keyboard or in LAN API Access. If you need to enter the address manually, use the address shown on the TV.
The web remote has a D-pad, media keys, a number pad, and a text field. It is the easiest way to enter search terms, passwords, and channel names, and it replaces the on-screen keyboard.
If BingeBop is running directly on your phone or tablet, use the built-in touch remote described in Section 1.6. The web remote is for controlling BingeBop on another device.
19.4 QR Stream Handoff
BingeBop can show a QR code on the TV screen. Scan it with your phone to continue the same live channel in your browser. No app installation is necessary.
QR handoff does not use an additional provider connection. The phone must be on the same local network as the TV.
Support & Feedback
How to get help, report faults, ask for features, and reach the BingeBop community.
20.1 Getting Help
If something does not work correctly, do these steps before you contact support:
- Look for recent errors in the Event Log (Settings → System → Network Diagnostics → Event Log). It usually names the fault.
- If a channel does not play correctly, run the Connection Troubleshooter (Settings → System → Network Diagnostics → Connection Troubleshooter). It shows whether the cause is your network, your provider, or the app.
- Read the chapter of this manual for that function. A note or a tip there can explain the behaviour.
- If the problem continues, contact support. See below.
20.2 Contacting Support
You can reach the BingeBop team on these channels:
- GitHub Issues
- Technical issues are best reported in the BingeBop issue tracker, where they can be tracked and updated.
- Discord
- Join the BingeBop Discord server for help from the community and discussions about features. This channel gives the fastest answer. Pro subscribers also get a priority support channel.
- The r/BingeBop subreddit is good for feature requests, tips, and discussion.
- For private subjects such as account and licence questions, which do not belong in a public channel.
20.3 Reporting Bugs
If you find a fault, report it in the BingeBop issue tracker so it can be tracked. Give this information:
- What happened — a clear description of the problem.
- Steps to reproduce — your actions before the fault, and whether the fault happens again.
- Device and version — your device model and your BingeBop version number.
- Event log — open Settings → System → Network Diagnostics → Event Log. Attach a screenshot or export of the recent Event Log entries.
20.4 Requesting Features
Feature requests are welcome on Discord and on the subreddit.
A good request describes a problem, for example "I cannot find channels by genre". A request for one solution, such as "add a genre filter", is less useful. With the problem, we can find the best solution.
20.5 Checking for Updates
BingeBop looks for updates automatically. You can also start a check in the settings. When an update is available, a message appears with the release notes and an install button. For details, see Chapter 18: System & Maintenance.